Pages

Sunday, December 26, 2021

ChezCindy: Halibut Rillettes Appetizer


This recipe is a bit indulgent, but worth every penny for the elegant flavor it presents.  Fresh halibut is a beautiful fish, available only certain times of the year.  I have been buying it from Costco at a reasonable price.  Compared to salmon or cod, it is still expensive.  The fish is rich and only requires a small 4-6 ounces piece per person for a satisfying dinner.  I decided to make my roasted fish in parchment paper, cooking the halibut on a sheet tray using the gas grill instead of my oven.  The temperature of the grill got a bit high, sadly somewhat overcooking the fish.  It was good, but just a bit dry.  We had leftover halibut from that dinner, being way too expensive to waste.  I decided to turn it into halibut rillettes.  This turned out to be delicious salvation of a fish too dry. 

A simple creation using my same salmon rillette recipe.  For this recipe, I used only fresh roasted halibut, not having any smoked halibut.  The halibut appetizer is more delicate than the salmon, more elegant.  Each are delicious and worthy of serving to guests.  


Halibut Rillettes Appetizer
3-4 ounces of steamed or poached halibut, cooled
2 teaspoons fresh chives, minced
1 tablespoon fresh lemon juice
1/4 cup mayonnaise, more to taste
1/4 teaspoon kosher salt
pinch of white pepper

In a small bowl, using a wooden spoon, stir the cooked and cooled halibut to break it into small pieces.  Add in the minced chives and the lemon juice. stirring to combine.  Add the in the mayonnaise, seasoning with the salt and white pepper.  Gently stir to combine.  Refrigerate until ready to serve.  Spread onto toasted baguette slices or crackers. 


Thursday, December 23, 2021

ChezCindy: Shaved Brussels Sprouts & Pomegranate Salad


A refreshing salad is always welcome at the table during a season of indulgent holiday food.  I like this pretty salad using pomegranate seeds and oranges, two ingredients available this time of year, particularly the pomegranates.  I used shaved Brussels sprouts and curly endive greens for the base of the salad.  If Brussels sprouts are not for you, try using thinly sliced kale or escarole greens.  The key is to use hardy winter greens that are not as prone to wilting once the salad is dressed with the vinaigrette.  Shaved radicchio would be nice too, adding even more color.  

A fun ingredient in the vinaigrette dressing is pomegranate molasses.  It adds a bit of tartness to the dressing lending some crimson color as well.  To offset the bitter greens used in the salad, I add agave syrup or honey for a balance of sweetness.  

The salad is perfect for entertaining as it can sit at room temperature for 30 minutes before serving.  Think of this as a dish to bring to help out the host for contribution to the holiday table.  Or as the host, something you can make ahead while you finish preparing the main course.  


Shaved Brussels Sprouts & Pomegranate Salad
1 pound Brussels sprouts, thinly sliced 
2 cups curly endive thinly sliced into ribbons
1/4 cup pomegranate seeds
1 orange, cut into segments

Using a food processor with the slicer attachment, or a sharp knife, thinly slice the Brussels sprouts.  Place the sliced sprouts into a medium size bowl.  Thinly slice the curly endive into ribbons, adding these to the sprouts.  Make the vinaigrette, drizzle about 1/3 cup of the dressing over the salad greens, tossing to combine.  Transfer the dressed greens to a serving platter.  Scatter the pomegranate seeds and the orange segments over the dressed greens.  Drizzle a bit more dressing over the pomegranate seeds and oranges.  The salad can be served immediately or is even better at room temperature having set for 30 minutes.  

Pomegranate Vinaigrette
2 tablespoons apple cider vinegar
2 teaspoons pomegranate molasses
1 tablespoon agave syrup or honey
1 tablespoon Dijon mustard
1 teaspoon kosher salt
8 tablespoons olive oil

Add the vinegar, pomegranate molasses, agave, Dijon mustard, and salt to a medium size bowl.  Using a whisk, mix to combine.  Slowly drizzle in the olive oil, whisking while you drizzle to emulsify the ingredients into a creamy consistency.


Sunday, December 19, 2021

ChezCindy: Chocolate-Gingerbread Cookies


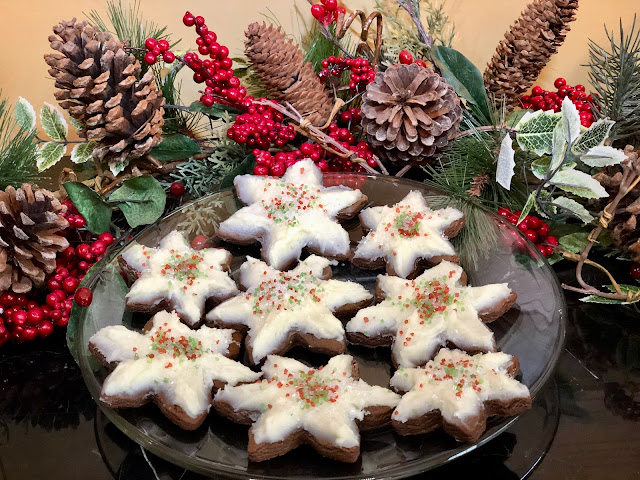
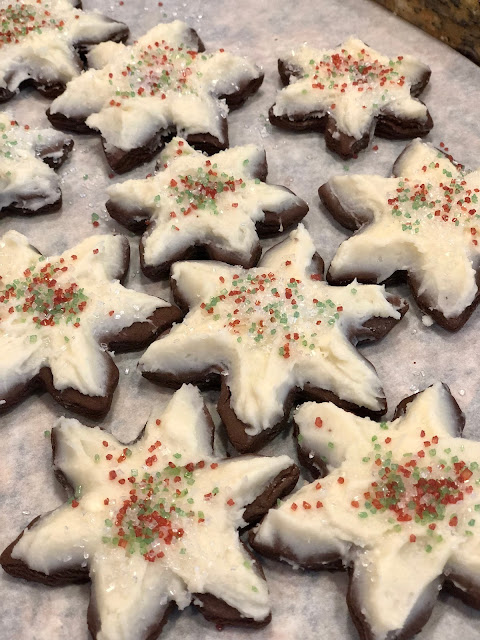
This cookie recipe is a celebration of chocolate and gingerbread spices.  I discovered this recipe for Chocolate-Gingerbread Cookies in 2009, created by Matt Lewis and Renato Poliafito from Baked bakery in New York.  The recipe was published in Food & Wine magazine and has been a favorite of mine for years, and for those with whom I share the cookies.  Particularly for one young fan, all grown-up now, who gave me rave reviews at that young age wondering why I did not have my own bakery.  Thank you, Jamie.     

The dough for this cut out cookie is easy to work with.  Great for bakers who are new to rolling out dough.  It does require chilling time in the refrigerator before rolling and cutting can begin.  As long as you plan ahead, you will be pleased with the results.  If you are looking for a cut out cookie that can be baked without chilling, I have that recipe for you here.


Chocolate-Gingerbread Cookies
3 1/4 cups all-purpose flour
1/3 cup unsweetened cocoa powder
1 tablespoon ground ginger
2 teaspoons ground cinnamon
1 teaspoon ground cloves
1 tablespoon baking soda
1/2 teaspoon baking powder
1 teaspoon kosher salt
5 tablespoons unsalted butter, softened
1/3 cup vegetable shortening, such as Crisco
1/2 cup dark brown sugar, packed
1 large egg, room temperature
1/2 cup molasses
2 ounces bittersweet chocolate, melted

In a medium size bowl, add the flour, cocoa powder, the spices, baking powder, baking soda, and salt, whisking to combine.  Set aside.  

Working with the bowl of a stand mixer, add in the softened butter and shortening, mixing until combined.  To this, add in the brown sugar mixing together until well combined.  This process will take several minutes, stopping the mixing to scrape down the sides of the bowl 2-3 times.  Add in the egg, mixing for about 30 seconds until incorporated, then add in the molasses and melted chocolate, mixing until smooth and combined, again scraping down the sides of the bowl.  Add in the flour mixture in three separate batches, slowly mixing each time until the dough is formed.  Divide the dough into 3 equal parts, wrapping each in plastic wrap, refrigerating the cookie dough until chilled, about 2 hours.  

Preheat the oven to 350 degrees.  Remove the wrapped cookie dough packages from the refrigerator, allowing it to warm a bit, for about 20-30 minutes.  Line large baking sheets with parchment paper.  On a lightly floured work surface, roll out the dough to 1/4-inch thick.  If the dough cracks a bit while rolling it, simply pinch it together and continue rolling.  Cut out shapes with your choice of cookie cutter, transfer each to the prepared cookie sheet.  Gather and roll out the remaining scraps to cut out more cookies.  

Bake the cookies for 7 minutes, placing the baking sheet on the center rack of the oven.  Once the cookies are baked, remove from the oven allowing the cookies to cool on the sheet tray for 5 minutes, then transfer to a wire rack to cool completely.   Continue rolling and cutting with the remaining dough.  

Ice the cooled cookies with Mascarpone Frosting, or your favorite buttercream frosting.  

Mascarpone Frosting
1 stick, (8 tablespoons) unsalted butter, softened
1 8-ounce container mascarpone cheese, softened
3 1/2 cups powdered sugar, sifted
1 teaspoon vanilla extract

Working with an electric mixer, place the butter into the bowl, beating until smooth.  Add in the mascarpone cheese and vanilla until combined.  Gradually add in the powdered sugar until smooth and creamy.  Use the frosting to ice the cookies or your favorite cake or cupcakes.  


Sunday, December 5, 2021

ChezCindy: Quick Vegetable Sauté with Pasta, Sumac and Thyme


This colorful dish was created with urgency as I was really hungry and wanted to eat something wholesome and delicious that would be ready to eat in minimal time.  I was having one of those moments when I was about to grab anything in sight just to fill my belly.  

A quick look in the refrigerator led me to some pre-sliced carrots from the previous day, and left over plain gemelli pasta.  That was a good start.  From there, I went to the pantry thinking I would grab a red onion.  Instead I saw that the sweet potatoes were looking sad to the point of 'eat these soon or toss them out'.  I don't like wasting food, so I grabbed the worst looking one from the bin.  From here, I now had a theme of using orange vegetables, so I included an orange bell pepper from the fridge.  I was in process of not only creating a quick vegetable pasta dish, but having fun doing it.  Even the use of sumac to season the dish added another deep orange color as well as a wonderful note of citrus.  

The dish could actually be created with any vegetables you have available.  The key to quick cooking is to slice each of the vegetables thinly so that they sauté in a few minutes.  I used carrots, sweet potato, orange bell pepper seasoned with sumac and thyme leaves.  Thinly sliced purple cabbage, red onions, and purple Peruvian potatoes would be fun too.  Another key to quick cooking is having some foods cooked ahead and stored in batches either in the refrigerator or freezer.  I often have leftover plain pasta, cooked quinoa, and brown rice stored in plastic zip bags in the freezer ready for use.  Using canned chickpeas and other beans are useful in adding protein and texture to a main course, also quick to complete the creation.  Below is the recipe and process for the making a quick vegetable sauté with pasta.   


Quick Vegetable Sauté with Pasta
2 tablespoons olive oil
2 medium size carrots, peeled and sliced thinly
2 medium size sweet potatoes, peeled and sliced thinly
1 large orange bell pepper, seeded and sliced thinly
1 teaspoon kosher salt, divided
8 ounces cooked pasta such as gemelli or bowtie
1 teaspoon dried sumac
1/2 teaspoon fresh thyme
3 tablespoons grated Pecorino Romano cheese
Additional olive oil for drizzling to finish the dish

Working with a large sauté pan over medium-high heat, add in the 2 tablespoons of olive oil.  Once the oil is hot, add in the sliced carrots and sweet potatoes, stirring to coat in oil.  Sprinkle with half of the salt, stirring again to keep the vegetables moving and evenly cooking.  Sauté the vegetables for about 3-5 minutes, then add in the sliced peppers, stirring to combine.  Continue cooking until the vegetables are starting to be tender and mostly cooked through, about 5 minutes.  Add in the cooked pasta, stirring to combine and to heat through.  Sprinkle the contents with the remaining salt and sumac, stirring to combine.  The vegetables should now be fully cooked and tender, but still hold their shape and not mushy.  Turn off the heat, sprinkle with the fresh thyme.  Transfer the vegetables and pasta to a serving bowl, sprinkling on the grated Pecorino cheese, finishing with a drizzle of olive oil.  Serve and enjoy.


Tuesday, November 23, 2021

ChezCindy: Roasted Acorn Squash with Chicken and Rice

Acorn squash is a versatile vegetable often roasted as a simple side dish, glazed with butter and brown sugar.  A method used to make a good accompaniment to roasted turkey at the holiday dinner table. 

 In this recipe, I am using the squash as a vessel for the main dish, filling the roasted halves with a creamy chicken and rice mix.  I use a medley of fresh herbs, parsley, sage, rosemary and thyme, to add flavor and color to the mix, hitting all the notes for a lovely autumn dinner.  


Roasted Acorn Squash with Chicken and Rice
2 medium acorn squash
4 tablespoons olive oil, divided

1/2 pound ground chicken or turkey
1 medium yellow onion, diced
1 cup diced white button mushrooms
2 cloves garlic, minced
2 teaspoons kosher salt, divided
1/4 teaspoon black pepper
1/4 teaspoon red pepper flakes
2 teaspoons minced fresh rosemary
2 teaspoons minced fresh sage
1 teaspoon minced fresh thyme
1 tablespoon minced fresh parsley
2 cups of cooked rice or cauliflower rice
3 tablespoons cream

4 tablespoons grated Parmesan cheese

Preheat oven to 400 degrees.  Cut each acorn squash in half, scoop out the seeds.  Place each half cut-side down on a cutting board.  Slice off a thin bit from the skin of the squash so that when turned over, the squash half will sit level on the baking tray.  This will keep the squash from wobbling around and spilling out the filling.  

Rub the cut squash with 2 tablespoons of olive oil, placing cut-side down on a large heavy-duty baking sheet with sides.  Place the tray with the squash into the preheated oven, center-rack, roasting for roughly 30 minutes.  The squash flesh should feel tender when gently pierced with a fork.  Remove from the oven, set aside to add the filling.  Turn off the oven.  

While the squash is roasting, place a large skillet over medium-high heat.  Add the remaining 2 tablespoons of olive oil to the pan.  When the oil is hot, add in the ground chicken and 1 teaspoon of salt, stirring to break up the meat into small crumbles.  Cook until lightly browned.  Remove the chicken from the pan onto a plate, set aside.  

Cook the diced onions in the same pan, stirring until soft.  Add in the diced mushrooms, tossing together with the onions.  If the pan is too dry, add in another tablespoon of oil.  When the mushrooms and onions are tender, add in the minced garlic, cooking for about 30 seconds.  Add the cooked chicken back to the pan with the cooked vegetables.  Season with the remaining teaspoon of salt, black pepper, red pepper, all of the chopped fresh herbs stirring to combine.  Add in the rice stir to combine.  Stir in the cream to coat the chicken and vegetables.  Turn off the heat.  

Bring it all together:  Turn on the broiler.  Keeping the squash on the roasting pan, turn each half cut-side up.  Generously fill each half with the creamy chicken and vegetable rice mixture.  Sprinkle 1 tablespoon of grated cheese onto the top of each filled squash.  Place the sheet tray with the filled squash under the broiler for 3-4 minutes until the cheese is lightly browned.  Carefully remove from the broiler, serve hot.  


Sunday, November 14, 2021

ChezCindy: Cranberry-Walnut Pumpkin Muffins


This lovely autumn seasonal pumpkin recipe can be baked into muffins or as a quick-bread.  The addition of yellow cornmeal is different from other pumpkin baked goods, enhancing the texture and adding structure for a muffin or bread that puffs up tall to fill the pan as it bakes.  

My mother made pumpkin breads and muffins when we were young kids every fall season.  She offered the pumpkin treats with a spread of cream cheese.  If you have not tried this combination, I encourage you to do so.  The crunch of the walnuts and the tart cranberries are delightful paired with the creamy savory cheese, and the sweetness of the baked good.  

I use my pumpkin pie spice blend in this recipe.  Putting this spice blend together is a quick start to many sweet pumpkin recipes.  The muffins would also be really good with a homemade pumpkin butter.   


Cranberry-Walnut Pumpkin Muffins
1 1/4 cups all-purpose flour
1/2 cup yellow cornmeal
1 1/2 teaspoons baking powder
1/2 teaspoon kosher salt
1/4 teaspoon baking soda
2 teaspoon pumpkin pie spice*
3/4 cup dark brown sugar
1/2 cup granulated sugar
2 large eggs, lightly beaten
1 cup pumpkin puree
3 tablespoons canola oil
1 1/2 teaspoons vanilla 
1 cup dried cranberries
1/2 cup chopped toasted walnuts

Makes 12 standard size muffins or 1 9x5-inch loaf 

Preheat the oven to 350 degrees.  Line a standard size muffin tin with 12 paper cupcake liners.  Set aside.  Or if using a 9x5-inch loaf pan, lightly grease the pan with baking spray.  

Working with a large mixing bowl, measure out the dry ingredients, starting with the flour to the pumpkin pie spice, adding these to the mixing bowl.  Stir to combine.

Working in a separate medium size mixing bowl, add in the sugars and the eggs, mixing until well  combined.  Add in the pumpkin puree, oil, and vanilla, mixing until combined.  Transfer the sugar-pumpkin mixture to the large mixing bowl with the dry ingredients, stirring until fully combined.  Fold in the dried cranberries and the chopped walnuts, folding until evenly mixed.  

Using a 1/4-cup spring-loaded ice cream scoop, scoop out the thick batter into the prepared muffin tray.  Or, transfer the batter to the 9x5-inch loaf pan.  Place the muffin tray, or loaf pan, into the preheated oven.  Bake the muffins for 22-24 minutes.  Bake the loaf bread for 50-55 minutes.  A wooden skewer inserted into the middle will come out clean with a few crumbs attached.  Remove from the oven, allow to cool in the pan for 10 minutes before removing, setting onto a wire rack to cool. 


*If not using pumpkin pie spice, you can substitute 1 teaspoon ground cinnamon, 1/4 teaspoon ground nutmeg, 1/2 teaspoon ground ginger, 1/4 teaspoon ground allspice or ground cloves.


Monday, November 1, 2021

ChezCindy: Gingerbread Bundt Cake with Sugar Doughnut Glaze


I don't make Bundt cakes very often.  When I do, I think of them to be something special.  It's probably because of the beautiful design created from the cake pan and the hope that it will turn out of the pan in one gorgeous shape.  This one not only turned out nicely, but the taste was spectacular with gingerbread spices.  

I have fond memories of my mother making a pistachio Bundt cake for my grandfather, her father, when he came to visit us.  This cake became a signature cake for her, making it mostly for special occasions.  For that time, it was very hip to use supermarket help when baking.  The recipe she made used a box of Jell-O pistachio pudding mix.  My mother most likely found the recipe in one of the magazines she subscribed to, or even from the back of the pudding box.  To us kids, it may have been a bit too grown up for us, at least for me it was.  My palette sure has changed.  

I love all things gingerbread, as you might notice from my earlier posts.  This recipe from King Arthur Baking Company does not disappoint.  The ginger and other spices take front and center in this moist delicious cake.  The glaze may seem odd at first as it is very thin, not a thick icing at all.  Once the sugar glaze is applied, it soaks into the cake, creating a sparkling sugar appearance like that of a sugar doughnut.  Really wonderful and delicious.   


Gingerbread Bundt Cake with Sugar Doughnut Glaze

2 1/2 cups all-purpose flour
2 1/2 teaspoons ginger
1 1/2 teaspoons cinnamon
1 teaspoon nutmeg
1/2 teaspoon cloves
1/2 teaspoon allspice
1/2 teaspoon salt
1/4 teaspoon baking soda
1 teaspoon baking powder
12 tablespoons unsalted butter, room temperature
1 1/2 cup brown sugar, lightly packed
2 large eggs, room temperature
1/2 cup molasses
1 cup water

Sugar Doughnut Glaze
1/3 cup water
1/4 teaspoon ginger
1/4 teaspoon cinnamon
3/4 cup granulated sugar

Preheat the oven to 350 degrees.  Prepare the Bundt cake pan by either spraying it was a flour baking spray, or using a brush to coat the pan with melted butter and dusted with flour.

In a large separate bowl, add the flour, spices, salt, baking soda and baking powder, whisking all to combine.  Set aside.  

Working with a stand mixer, or using a hand mixer, add in the butter and sugar, mixing together until fluffy.  Add in the eggs, one at a time, mixing to combine, scraping the bowl after each addition.  Mix in the molasses.  Add in the flour mixture alternately with the water, starting and ending with the flour.  Mix just until smooth.

Transfer the batter to the prepared Bundt cake pan, smoothing the top.  Bake the cake for 45-55 minutes, until a cake tester inserted into the center of the cake comes out clean with just a few crumbs.

Remove the cake from the oven allowing it to cool in the pan for 10 minutes.  While the cake is cooling for the 10 minutes, make the sugar glaze by adding the ingredients to a small bowl. stirring until combined.  Turn out the cake onto a wire rack.  

While the cake is still warm. brush the cake with the sugar glaze, using the full amount to cover generously.  Allow the cake to cool fully before slicing and serving.  


Sunday, October 24, 2021

ChezCindy: Versatile Potato Gratin


As soon as the weather turns a bit cooler, approaching fall and winter, I get the urge to make a potato gratin dish.  This is a favorite in our house.  It is a bit indulgent with the cream and cheese, but so good by itself and pairs well with other vegetables and meat.  

This version is made with potatoes and butternut squash.  I had just made my butternut soup recipe, and had leftover squash.  It seemed like a good use to slice the squash thinly and add it to the potato gratin.  The squash not only added beautiful color, but also added a sweetness in contrast to the rich potatoes and cheese.  

Gratins in general are most often made with just potatoes and usually cheese, the standard cream or milk, and seasoning.  I often use other vegetables that can be sliced thinly like the potatoes, such as sweet potatoes, turnips, or rutabaga.  All are good.  Cheeses can also be varied using parmesan, cheddar, gruyere, or a mix of whatever you have available.  Put it all together and bake at the temperature of choice if you happen to be roasting a chicken or braising something fabulous.  The temperature can range from 325 up to 425, with the length of cooking time adjusted accordingly.  If using a high temperature and the top gets too brown, simply cover with foil and continue cooking until the potatoes are tender and the cream has thickened.  Use the recipe below as your guide, adjusting to your preference and whims.  


Versatile Potato Gratin

2-3 pounds potatoes, Russets or Yukon Golds
2 cups heavy cream
2 cloves garlic, minced
1 teaspoon fresh thyme leaves
1 cup parmesan cheese, grated
2 teaspoons kosher salt

2 tablespoons butter for preparing the casserole dish

Preheat the oven to 375 degrees.  Using a food processor with the slicing disk, or a mandolin, or just a sharp knife, thinly slice the potatoes.  If using Russets, I scrub and peel these potatoes.  Yukons have thin skin so I usually just scrub these really well and do not peel.  

Place the heavy cream and the minced garlic into a small sauce pan.  Gently warm the cream and garlic for a about 5 minutes, but do not boil.  Turn off the heat.  Add in the fresh thyme leaves.  

Prepare a 10-inch ceramic or Pyrex glass casserole dish by generously buttering the sides and bottom of the dish.  Begin to build layers of potatoes by placing a layer of the thinly sliced potatoes on the bottom of the dish.  Sprinkle with a bit of salt.  Ladle a quarter of the cream/garlic/thyme mixture over the potatoes.  Sprinkle 2 tablespoons of cheese over the potatoes.  Continue building with 3 additional layers. For the top layer, add all of the remaining potatoes, making this your prettiest layer, using all of the cream and the remaining cheese.   

Place the casserole dish into the hot oven, baking for 45 - 50 minutes, until the potatoes are tender, the cream has thickened, and the gratin is bubbly and golden brown.  Let stand for 10 - 20 minutes before serving.  

Monday, October 11, 2021

ChezCindy: Pumpkin Pie Spice Granola


Wonderful to have on hand for the season is this delicious Pumpkin Pie Spice Granola.  All the flavor notes of autumn with pumpkin seeds and warm spices like nutmeg, cinnamon and ginger.  Great to eat as a snack, or for breakfast with your favorite milk, or as a topping over yogurt.  Try making your own mix of pumpkin pie spice with this easy recipe.  Or purchase from your grocer in the baking aisle.  


Pumpkin Pie Spice Granola
1/3 cup coconut oil, melted 
1/2 cup maple syrup
1 teaspoon vanilla extract
3 cups old fashioned oats
1 cup pepitas, raw pumpkin seeds
1 cup chopped pecans
3 tablespoons brown sugar
1 1/2 tablespoons pumpkin pie spice
1 teaspoon kosher salt
1 cup dried cranberries

Preheat oven to 300 degrees.  Line 2 large rimmed baking sheet pans with parchment paper. 

In a small saucepan, melt the coconut oil; cool.  Add in the maple syrup and vanilla.  Whisk to combine. 

In a large bowl, add the oats, pepitas, pecans, brown sugar, pumpkin pie spice and salt.  Stir to combine.  Pour the coconut oil syrup mixture over the oats, stirring well to coat the oat ingredients.  Wait to add the dried cranberries until granola is baked.  Adding the dried fruit during the baking time makes the fruit tough and over-dried.  

Transfer the oat mixture to the lined sheet pans, spreading into a even layer.  Bake in the oven for 50 minutes, until lightly browned without stirring.  Remove from the oven.  Add the dried cranberries at this time.  Allow the granola to cool on the sheet pans.  When completely cool, break the granola into pieces and transfer to an airtight container, such as mason jars or zip-lock bags.  Granola will stay fresh in your pantry for 3-4 weeks.  The granola can also be frozen for later use.  


Sunday, October 10, 2021

ChezCindy: Easy Blueberry Crisp - Gluten Free


Fruit crisps are a favorite in this house.  Easy to put together with any fruit available for the season.  In a pinch, frozen fruit can also be used.  

I often play around with different flours to create a gluten free recipe.  I recently discovered cassava flour from another recipe I was interested in.  Cassava flour is made from the tropical root vegetable, dried and pulverized into flour.  It can substitute 1:1 for wheat flour, providing a good alternative for those seeking a gluten-free diet.  I have used it in other recipes with a blend of other flours to make delicious cookies.  Fruit crisp recipes do not require much flour, so it is an easy swap.  If gluten free is not for you, then regular all-purpose flour can be used.  


Blueberry Crisp Desserts - Gluten Free
1 pint fresh or frozen blueberries
2 tablespoons granulated sugar
1 tablespoon cassava flour
1 teaspoon lime juice
2 teaspoons orange juice

Topping:
1/4 cup butter, softened
1/3 cup granulated sugar
1/4 cup almond flour
3/4 cup old fashioned rolled oats
1/4 cup slivered almonds
1/4 teaspoon cinnamon

Makes 4 ramekins

Preheat the oven to 375 degrees.  Line a sheet tray with parchment paper.  Lightly grease 4 ramekins for baking the fruit crisps.  

Combine the blueberries, sugar, cassava flour, and juices in a medium bowl, tossing all to coat the berries.  Divide the fruit mixture between the 4 prepared ramekins, placing the ramekins onto the lined sheet tray,

To make the topping, in a second medium bowl, combine the butter, sugar, almond flour, oats, almonds and cinnamon.  Using a fork, work in the butter to mix with the rest of the ingredients to create a crumbly topping.  

Generously top each of the filled ramekins with the crumb topping to cover the blueberries.  Place the sheet tray in the oven, baking for 35-40 minutes until the tops are golden brown and the fruit is bubbling through the topping.  Cool slightly before serving.  Serve warm.  


Sunday, October 3, 2021

ChezCindy: Sheet Pan Roasted Autumn Vegetables


Making the transition from summer to fall is easy to navigate with this recipe of Roasted Autumn Vegetables.  Actually it is a mix of fruit and vegetables.  Beautiful crisp apples, fresh cranberries, butternut squash and red onions.  All of this produce lends to a bit of sweetness when roasted, combined with an herbed olive oil.  When I tossed these vegetables onto the sheet pan, it looked like autumn.  I just had to capture a photograph.  

The roasted vegetables can be center of plate served with farro, an ancient grain with a nutty chewy texture.  Or, add Italian sausage links to the sheet pan before roasting for a delicious dinner.  


Sheet Pan Roasted Autumn Vegetables
1/2 cup olive oil
3 sprigs of fresh herbs - thyme, rosemary and/or sage

1 medium butternut squash, about 1 1/2 pounds
1 large red onion
2 firm-tart apples, such as granny smith
1/2 cup fresh cranberries*
1 1/2 teaspoons kosher salt, divided

4 fresh mild Italian sausages, optional
1/2 teaspoon McCormick Grill Seasoning, optional

Preheat the oven to 425 degrees.  

Combine the olive oil and the fresh herbs in a small saucepan.  Place over medium heat, bringing the oil to a simmer.  Heat the oil for about 3 minutes until the herbs have wilted slightly and the oil is fragrant.  Remove from the heat, setting aside.  

Prepare the produce:  Cut the squash into 2 pieces separating the large bulbous part from the long thin portion of the squash.  Set the seeded bulb section aside for another use.  Peel the remaining squash section.  Cut the squash in half lengthwise.  Cutting crosswise, cut each half into 1/2-inch planks - the planks will look like half-moon shape.  Remove the skin from the red onion, cutting the onion into 1/2-thick wedges.  Cut the apples, unpeeled, into quarters, remove the core from each quarter.  Cut each quarter into 1/2-inch wedges.  Place the cut vegetables/apples, plus the fresh cranberries into a large bowl.  Pour half of the oil over the vegetables and fruit.  Sprinkle with 1 teaspoon of salt.  Toss together.  Transfer all to the sheet pan, spreading into an even layer, scraping the oil from the bowl onto the sheet pan.  Top the produce with the sprigs of herbs that were wilted with the olive oil.  Save the remaining herbed olive oil for another use.  It will be delicious with toasted ciabatta bread for bruschetta.  

If using the optional Italian sausage:  using a fork, prick each sausage several times to keep them from splitting while roasting.  Place the sausage on top of the vegetables/fruit.  Drizzle a bit of the herbed oil over the sausages.  Sprinkle the McCormick seasoning over the sausages.  

Place the sheet pan into the hot oven, roasting for 25-30 minutes until the vegetables/apples are tender and lightly browned, and if using, the sausages are cooked through (internal temperature of 160 degrees).  Sprinkle with the remaining 1/2 teaspoon of salt, and a drizzle of the herbed olive oil.   Serve hot.  


* dried cranberries can be substituted for fresh.  The dried berries will need to be added to the sheet tray at the end of the roasting time, about 10 minutes remaining in the cook time.  

Recipe adapted from The Apple Lover's Cookbook by Amy Traverso

Saturday, September 25, 2021

ChezCindy: Sheet Pan Tomato & Pesto Tart


A last celebration of summer cherry tomatoes comes together in a savory sheet pan tomato and pesto tart.  I had two different pesto sauces in my fridge, one being the sun-dried tomato pesto recipe I recently posted, and a standard basil pesto.  You could use one or the other, using store-bought or homemade.  

Grab that last bit of sunshine for an early evening appetizer or a light supper with a glass of crisp white wine.  Enjoy!  


Sheet Pan Tomato & Pesto Tart
1 sheet puff pastry, such as Pepperidge Farm
3 tablespoons Dijon mustard
1 cup shredded Gruyere cheese
1/2 cup shredded Parmesan cheese
2 pints assorted cherry tomatoes, each tomato cut in half
1/4 cup basil pesto, store bought or homemade*
1/4 cup sundried tomato pesto, store bought or homemade*

1 tablespoon olive oil
kosher or sea salt for serving

Preheat the oven to 400 degrees.  

Thaw one sheet of puff pastry according to package directions.  Once thawed, place the folded pastry dough onto a sheet of parchment paper, unfold.  Using a rolling pin, roll out the dough to roughly 12x10- inch rectangle.  Transfer the parchment paper carrying the dough placing onto a large sheet pan with sides.  Score a ½-inch border at the edges of the puff pastry dough, being careful not to cut through.  This will form an edge for the tart.  Using a fork, dock the dough within the borders, adding tiny holes every inch or so.  This will allow steam to escape when baking.

Place the Dijon mustard in smalls spoonsful over the dough.  Using a pastry brush, spread the spoonsful of mustard over the dough, "painting" it with mustard, but leaving the borders uncoated.  Lightly sprinkle 1 cup of shredded Gruyere cheese over the mustard.  Place the cut cherry tomatoes in a single layer, use a decorative fashion if desired, over the surface of the dough, staying within the borders.  Using a spoon, drizzle the pesto sauces over the tomatoes.  Sprinkle with the Parmesan cheese.  


Place the sheet tray into the hot oven.  Bake the tart for 15-20 minutes, until the crust is golden brown.  Remove from the oven, allowing the tart to cool for 5 minutes.  Drizzle the tablespoon of olive oil over the tart, with a final sprinkling of sea salt before cutting into squares for serving.  The tart may puff up while baking, but it will settle once removed from the oven.    


*  in place of using 2 types of pesto, use 1/2 cup of either the sun-dried tomato or basil pesto.


Monday, August 30, 2021

ChezCindy: Grill "Roasted" Potatoes


I had a craving for roasted potatoes but did not want to turn on the oven to a high heat roasting temperature in the "dogdays" of summer.  So, I turned to my gas grill to meet the craving. 

This is one of those dishes that is more of a process than a recipe.  My main ingredient was Yukon Gold potatoes.  Then I went to the pantry for other vegetables to roast along with the potatoes.  I had sweet Vidalia onions, red onions, poblano peppers, serrano peppers, red bell pepper and garlic.  My must have herb was fresh rosemary from my garden.  This was my combination.  But many other vegetables would work in combination to what you have and what you like.    

Working with a black iron skillet (very grill-proof) I first lined the pan with foil for easy clean-up.  I wanted to be sure the potatoes had direct surface exposure to the heat, so I placed them cut side down in the center of the pan.  Drizzled them with olive oil, with a generous sprinkle of kosher salt.  Then, nestled around the potatoes went the remaining vegetables of peppers, onions and garlic, each cut into pieces.  I gave all another sprinkle of salt and a dash of McCormick's Grill Seasoning for extra zip, with the fresh rosemary placed on top of the potatoes.  The iron skillet went onto the preheated hot grill, temperature around 425-450 degrees.  I cooked the mix of potatoes and vegetable untouched for about 40 minutes.  No stirring, no concern for too much color.  Once the potatoes were cooked through, browned and tender, I removed the pan from the grill.  And only then did I stir to combine.  

The potatoes and vegetables roasted beautifully and were perfect with burgers.  Just what my craving was seeking.  


Sunday, August 29, 2021

ChezCindy: Sundried Tomato Pesto with Gemelli Pasta


The recipe for this Sundried Tomato Pesto Pasta came from an Instagram post I saw from Giada De Laurentiis.  Her site is titled giadzy.  The video caught my attention seeing how easy it is to make, but a search of her web site provided the recipe. 

Giada added the sundried tomato pesto to gemelli pasta for a delicious dish shown above.  The pesto is also really good on its own for other uses.  I have used it topped on my morning eggs for a zippy breakfast.  Toss the pesto with roasted zucchini to bring a bright flavor to this mildly flavored vegetable.  It is also makes a wonderful summer appetizer drizzled on toasted sourdough bread with a glass of chilled crisp white wine.  Very summery.  


Sundried Tomato Pesto with Gemelli Pasta
1 jar sundried tomatoes, 7-8 ounces
2 cloves garlic
1 cup fresh basil leaves
1/2 teaspoon kosher salt
pinch of fresh ground black pepper
1/2 cup freshly grated Parmesan cheese

8 ounces gemelli pasta, or similar shape
Additional grated Parmesan cheese for serving

Cook the pasta according to the package directions.  Reserve 1 cup of the cooking liquid.  Drain, and set aside.  

Working with a food processor, add the sundried tomatoes, including the oil from the jar, and the garlic, process to combine.  Add in the fresh basil, salt and pepper, process to combine.  Transfer the tomato mixture to a large bowl.  Stir in the Parmesan cheese.  

Add the drained pasta to the pesto, tossing to coat.  Add in about half of the reserved cooking water to loosen the sauce and help coat the pasta.  Taste the pasta for seasoning, adding salt and pepper if needed to taste.  Drizzle with olive oil and additional Parmesan cheese and serve.  


Wednesday, August 18, 2021

ChezCindy: Jammy Breakfast Pastry Twists


I have kept folders of recipes torn from magazines and newspapers for years and years.  Before getting organized with the folders, I simply had stacks of loose paper recipes in no order.  But that was long ago.  Now I have folders with categories labeled by the protein type, vegetable group, two folders for dessert recipes, with a separate folder just for chocolate desserts.  A folder for breakfast recipes, one for quick breads and muffins, sides dishes and sauces, appetizers, and so on.  Of course, now we can find recipes on the internet, blog sites, and way more digital media.  But I still like the paper recipes that I can thumb through, finding what I have in mind.  Pulling out the tattered and stained copy of a well-loved recipe.  

The pastry pictured here was made from a recipe photocopied from Gourmet Magazine 2004.  Their titled name was Glazed Apricot Twists.  Since I was using this recipe for a Young Chefs cooking class, I gave it a new name that they might relate to better:  Jammy Breakfast Pastry Twists.  Not only did they like the name.  They LOVED the pastries!  Below is my adaptation of the Gourmet Magazine recipe.  

Jammy Breakfast Pastry Twists
1 sheet of frozen puff pastry, such as Pepperidge Farm
1/2 cup strawberry jam
1/4 cup powdered sugar
1 tablespoon cream or half/half

Thaw the puff pastry according to the package directions.  Keep chilled until ready to make the pastries.

Preheat the oven to 400 degrees.  Line a large sheet tray with parchment paper.  Set aside.

Remove one sheet of puff pastry from the package.  Store the second sheet in the refrigerator for another use.  On a lightly floured surface, roll out the puff pastry sheet to a 12x10-inch rectangle.  Cut the sheet in half lengthwise.  Cut each half crosswise into 4 pieces, each piece being 5x3-inches for a total of 8 pieces.  Spread each piece with 1/2 tablespoon of jam.  Fold each piece in half lengthwise to form a 1 1/2-inch wide strip.  Twist each strip three times and place the twisted strip onto the parchment paper lined sheet tray, pressing the ends of each strip to hold it in place on the tray.  Repeat with the remaining pieces of pastry.  

Bake in the preheated oven for 15-18 minutes until golden brown and puffed.  Remove the tray from the oven, allowing to cool for a few minutes.  Transfer each pastry to a cooling rack set over a piece of parchment paper.  

Combine the powdered sugar with the cream, stirring to form a smooth, creamy glaze.  Using a pastry brush, brush the sugar glaze over the pastries.  Serve warm or at room temperature.  


Wednesday, August 11, 2021

ChezCindy: Shakshuka-style Eggs with Ratatouille


Shakshuka is a North African dish made with simmering tomatoes, onions, and spices with poached eggs.  Here I made it using ratatouille, a dish with origins in the South of France made from summer ripened vegetables including tomatoes, eggplant, zucchini, peppers and more.  

I really look forward to this time of year when the summer produce is at it's peak.  With so many colors, shapes and variety of tomatoes, zucchini, eggplant, peppers, I cannot help but to bring home way more than I can use.  I always make ratatouille, akin to being a slow simmered vegetable stew with an abundance of olive oil to give it richness.  

Last summer I learned that ratatouille can be frozen without compromise in texture and quality.  I made a batch of it out of necessity as the vegetables were getting too ripe.  I made the vegetable stew and decided to try freezing it, not knowing how it would last.  Months later in the deep of winter, I thawed it and heated it to discover it was wonderful, bringing a bit of summer to that cold winter day.  I will be freezing more this summer.  

Ratatouille sounds fancy, but it is simply a farmer's harvest of vegetables.  I use a recipe from Jacques Pepin.  Who better to learn from than the master chef himself.  Below is my interpretation of Chef Pepin's classic ratatouille recipe.

Classic Ratatouille
3/4 cup olive oil, divided
1 medium eggplant, 8-10 ounces, cut into 1-inch cubes
3 medium zucchini, 8-10 ounces, cut into 1-inch cubes
12 ounces yellow onions, cut into 1-inch pieces
2-3 bell peppers, cored, seeded, cut into 1-inch pieces
5-6 medium size ripe tomatoes, coarsely cut into pieces
4-5 garlic cloves, chopped
1/2 cup water
2 teaspoons kosher salt, divided
1/2 teaspoon ground black pepper

Using a large stock pot over medium heat, add 1/4 cup of the olive oil to the pan.  Sauté each of the cut vegetables separately, beginning with the eggplant.  Cook the eggplant cubes for 6-8 minutes until softened.  Using a slotted spoon, transfer the eggplant to a large bowl.  Add 2-3 tablespoons of oil to the pan, continue sautéing with the zucchini for 5-6 minutes, remove to the same bowl with the eggplant.  Next, sauté the onions and pepper, adding 1 teaspoon of salt and a bit more olive oil, stirring together, cooking for 5-6 minutes until softened, but not browned.  Remove to bowl with the other vegetables.  Add in the tomatoes, chopped garlic, water, 1/2 teaspoon of salt and pepper, stirring to cook for 5-6 minutes.  Return all of the cooked vegetables from the bowl to the pan, adding these to the tomatoes.  Stir to combine, bring to a boil.  Reduce the heat to low, cover and cook for about an hour, stirring a few times.  

Remove the cover, increase the heat to medium, cook for another 20 minutes to reduce some of the liquid.  Taste for seasoning, adding in more salt and pepper as desired.  Stir in the remaining olive oil, adding more if desired to richen the sauce.  Serve the ratatouille hot or warm with pasta or rice, or spooned over cooked chicken or fish.  Also very good simmered as the poaching liquid for eggs.    


Friday, July 23, 2021

ChezCindy: Fresh Strawberry Meringue Pie


I had the good fortune of receiving fresh picked local strawberries this week that I had not planned upon.  Suddenly, I had gorgeous berries that needed to be eaten within a day or two.  Not a bad situation to be in.  I made jam with some of them, also baking flakey homemade biscuits for breakfast.  Such a treat.  With the remaining lovely ripe berries, I decided to make a fresh strawberry pie.  I have never seen a strawberry meringue pie but that was what I had mind.  I found a recipe for a fresh strawberry pie that was topped with whipped cream, most common for fresh strawberry pies.  I replaced the whipped cream with a cooked meringue for a fluffy marshmallowy topped pie.  It was delicious and fun to make!

Here's is how to make this lovely pie.


Fresh Strawberry Meringue Pie
Bake a single 9-inch pie crust in a pie pan as directed by your favorite recipe, or use a store-bought crust, baking and cooling.  Set aside for filling and topping the pie. 

For the Filling:
2 pounds fresh strawberries
1/3 cup granulated sugar
3 tablespoons strawberry preserves
1/4 cup cornstarch
1 tablespoon fresh lemon juice

Cut the strawberries into quarters or in half if they are small.  Transfer 2 cups of the cut berries to a small saucepan and crush with a potato masher.  Place the remaining strawberries into a large bowl, setting these aside for later use.  Add the sugar, preserves, and cornstarch to the saucepan with the crushed berries.  Set the saucepan over medium heat, stirring the contents and cooking until the mixture comes to a boil.  Cook at a boil for 2 minutes, stirring constantly.  Turn off the heat, add the cooked strawberries plus the lemon juice to the fresh strawberries in the large bowl.  Gently stir to coat the fresh strawberries with the cooking berry mixture.  Transfer the berry mix to the prepared baked and cooled 9-inch pie crust.  Cool for 3-4 hours.  

For the Cooked Meringue:
1 1/3 cups granulated sugar
1/4 teaspoon cream of tartar
4 large egg whites, room temperature

Place 1 cup of sugar, 5 tablespoons of water, and the cream of tartar into a small saucepan over medium heat.  Bring to a boil, cooking at the boil for 4 minutes.  While the sugar mixture is cooking, whisk the egg whites as described below.

Working with a stand mixer fitted with the whisk attachment, add the egg whites to the clean mixing bowl.  Beat on high speed for 2-3 minutes until soft peaks form.  Gradually sprinkle in the remaining 1/3 cup of sugar, whisking until the sugar is dissolved, about 1 minute. 

With the mixer running, slowly and carefully drizzle all of the hot sugar syrup into the meringue, aiming for pouring the syrup close to the side of the bowl, avoiding the whisk attachment.  Continue beating at high speed until the side of the bowl is cool to the touch.  This will take about 5-6 minutes.  You are essentially cooking the meringue with the hot syrup, turning it into a thick marshmallow-like fluff.  

Putting it all together:  
Once the strawberry mixture has cooled in the prepared pie crust and you are ready to serve, spoon the cooked meringue over the top of the pie, swirling to form pretty peaks.  If desired, toast the meringue with a kitchen torch, or place the pie on the bottom rack of the oven under the hot broiler for 10-15 seconds just until lightly browned.  

Serve the pie the same day as made.  


Sunday, July 18, 2021

ChezCindy: Italian-style Giardiniera Vegetables


Once again with my CSA, I have a variety of vegetables and way too many for immediate use.  Especially peppers.  (I need to research more ways to use peppers.)  I decided to use a mix of the vegetables to make giardiniera.  The funny face on the sliced cucumbers is just a happy bonus.

Giardiniera is Italian pickled vegetables.  The translation roughly means "from the garden".  It is a mix of vegetables preserved in a spicy seasoned vinegar.  Long preserving is shelf-stable and can stay on a shelf for a year.  This version is a quick-pickle meant to stay in the refrigerator for a few weeks.  The quick-pickle still preserves the vegetables, extending their freshness and adding great flavor.  It is just not fully sealed for long shelf life.

Traditional giardiniera includes olive oil as a marinade for the vegetables.  I like to add the olive oil after pickling and once I serve the vegetables.  The marinated vegetables are great added to sandwiches and salads or just simply on a anti-pasta plate with some crackers and cheese.  

I used sliced cucumbers, sliced pepper rings, thinly sliced carrots, spring onions and garlic, seasoned with fennel seeds.  These are common vegetables found in giardiniera.  The seasoning can be spicy hot by adding crushed red pepper flakes, or using hot peppers.  Use what you have and have fun with the added spices.  

Here is how to make Giardiniera:
Choose a variety of vegetables such as peppers, onions, carrots, green beans, or cauliflower.  Cut the vegetables into small bite-size pieces.  Add them to canning jars, such as Ball or Mason, with the proper canning lids.  The recipe below can be doubled or tripled.  

1-pound vegetables, cleaned and cut into pieces or thinly sliced
1 cup white vinegar
1 cup water
1 tablespoon kosher salt
1/4 cup granulated sugar
1 teaspoon dried whole spices, any combination

Place the cleaned cut vegetables into the canning jars, lightly packing to fit.  Combine the remaining ingredients in a sauce pan.  Bring to a boil, dissolving the salt and sugar.  Pour the hot liquid over the vegetables to cover them completely, filling the jar to 1/2-inch from the top of the jar.  Seal the jar tightly with the lid.  Allow to cool on the counter.  Place the cooled jar in the refrigerator.  Wait 24 hours before enjoying so that the vegetables have time to pickle.  The vegetables will develop more flavor as they age.  Store in the fridge for up to one month.  

To use the Giardiniera vegetables:  
Drain the vegetables from the pickling liquid.  Place the drained vegetables into a small bowl.  Drizzle 2-3 tablespoons of olive oil over the vegetables.  Top with a sprinkling of dried Italian herbs.  Serve with sandwiches or burgers, adding the vegetables as a topping.  Or mix in with fresh lettuces for a salad.  The marinated vegetables can also be plated with cheese and crackers for a first course or anti-pasta platter.  

Saturday, July 10, 2021

ChezCindy: Capellini Pasta "Omelet" with Parmesan


This is one of the coolest new recipes I have tried in years.  Every ingredient is cooked in the same pan, layering in one after the other.  At one point I was thinking, this cannot be right as I poured the raw whisked eggs into the super hot pan with partially cooked pasta and pasta water.  But it came together to create a delicate egg and pasta omelet, much to my pleasant surprise.  

The key to success for this recipe is using a quick-cooking pasta like capellini or angel hair that cooks in 4 minutes.  And, also using a good non-stick skillet that is oven safe up to 400 degrees.   

The recipe is from a new cookbook Cookish by Christopher Kimball of Milk Street.  The book offers recipes that are seemingly "thrown together" for quick cooking.  I like the way the book is organized, offering 3-4 different recipes using the same main ingredients, just changing up the seasoning and spices, and adding one or two additional ingredients.  I highly recommend this book for new cooks and also for experienced cooks.  It is full of fresh ideas for delicious dishes.  


Capellini Pasta Omelet
5 large eggs
2 1/2 ounces finely grated Parmesan cheese, plus more for serving
1 1/2 teaspoons kosher salt
pinch of fresh ground black pepper
2 tablespoons olive oil, plus more for serving
1/2 cup finely chopped yellow onion
6 ounces capellini pasta or angel hair pasta
3 cups fresh baby spinach

Preheat the oven to 400 degrees.  

Using a large measuring cup with a pour spout, whisk together the eggs, cheese and salt/pepper.  Set aside.

Working with an oven-safe 12-inch nonstick skillet over medium-high heat, add in the 2 tablespoons of oil and the finely chopped onion.  Stir frequently to keep the onions moving and from browning, cooking until softened, about 3-4 minutes.  Next, break the pasta strands in half, adding them to the pan with the onions, carefully pouring in 3 cups of water.  Stir to combine the water and pasta to keep the pasta from clumping together.  Continue to cook until most of the water has been absorbed by the pasta.  This will take several minutes.  Add in the spinach stirring to combine until the spinach is wilted.  Next, give the egg mixture a stir as it may have settled a bit.  Pour the egg mixture into the hot pan, stirring continuously to combine with the pasta, water, and spinach.  Stir until it just comes together.  Stop stirring and cook on the stovetop for about 3-4 minutes, just until the sides begin to show some browning.  Transfer the skillet to the hot oven, baking until the omelet is set, about 3-4 minutes.  Remove the skillet from the oven.  Drape a towel or hot pad over the handle to remind yourself of the hot handle, allowing the omelet to rest for 6-8 minutes.  Loosen the edges with a spatula, sliding the omelet onto a cutting board to serve.  Garnish with additional cheese and a drizzle of olive oil.  Serve hot or warm.

I like serving this with some homemade salsa or fresh garlicky tomato sauce on the side.  Excellent dish for breakfast, lunch or dinner.  


Recipe adapted from Milk Street Cookish cookbook, 2020.  

Wednesday, July 7, 2021

ChezCindy: Grilled Broccoli with Soy Balsamic Dressing


My CSA farmer, Knife & Fork Farms , has been having a good season with broccoli.  She has been adding broccoli to our CSA bags for the last 4 weeks.  And these are not tiny supermarket broccoli crowns.  She is giving us the entire broccoli plant, with leaves and all.  I've learned that the broccoli leaves are really delicious when steamed and tossed together with quinoa.  


As much as I like broccoli, I needed to find an interesting new way to cook it.  For quick cooking, I have been steaming it in the microwave as posted here.  And I love this updated broccoli salad.  For something new, I decided to try grilled broccoli.  

This grilled broccoli recipe calls for the broccoli to be tossed in a simple dressing of soy sauce, balsamic vinegar, and olive oil.  The broccoli is placed in a grill basket and grilled over high heat for 12-15 minutes.  The dressing imparts an interesting flavor, almost Asian because of the soy sauce but not quite.  The seasoned broccoli would pair nicely with a grilled skirt steak and a side of steamed rice.  

1 or 2 large heads of broccoli, about 2 pounds
3 tablespoons soy sauce
3 tablespoons balsamic vinegar
2 tablespoons olive oil, divided
1 teaspoon kosher salt, divided

Prepare a fire in your grill or set a gas grill to high.

Cut the broccoli heads into long pieces slicing through the stalk.  Set aside.  

In a large bowl, whisk together the soy sauce and the balsamic vinegar.  Drizzle in 1 tablespoon of olive oil, whisking vigorously.   Add the broccoli, using your hands to toss and coat evenly.  Sprinkle with 1/2 teaspoon of kosher salt.  

Place a large grill basket, or 2 small, onto the hot grill.  Add the broccoli, in one layer as possible.  Grill for 6-7 minutes.  Using tongs, turn or toss the broccoli for even cooking.  Continue grilling and tossing for 6-8 additional minutes until the broccoli tips are crisp and browned, and the stalks are tender.  

Transfer the cooked broccoli to a serving platter, drizzle with the remaining tablespoon of olive oil and sprinkle with the remaining kosher salt.  Serve hot or warm. 


Recipe adapted from New York Times Food


Sunday, July 4, 2021

ChezCindy: Chocolate Brownie Buttons


The more than half missing brownie buttons shown in the photograph above is evidence of how delicious they are.  I made a tray of 24 "buttons" allowing them to cool before finishing.  I was elsewhere in the house when my chocolate-loving husband came up to me offering confession.  He stated that I might be alarmed by how many brownie buttons were gone from the cooling tray.  This is what I found, 14 of 24 eaten!  I was not alarmed, but simply amused.  

Good thing this recipe is easy and comes together quickly.  The recipe is from a Dorie Greenspan cookbook titled Baking From My Home to Yours.  The book offers great recipes and insight for every home baker.  It has beautiful photos of the baked items and is clearly written with tips for success.  

The brownie buttons are a rich "one-bite" sweet treat.  They are quite good on their own, but I like to top them with melted chocolate to take them up to the next level. 


Brownie Buttons
1/4 cup plus 2 tablespoons all-purpose flour
pinch of fine sea salt
4 tablespoons unsalted butter, cut into 4 pieces
2 1/2 ounces bittersweet chocolate, 60% dark, chopped
1/3 cup light brown sugar, packed
1/2 teaspoon vanilla extract
1 large egg, room temperature

Chocolate Glaze
2 ounces white or dark chocolate, chopped

Working with a mini muffin pan with 24 wells, line each well with a mini muffin paper liner.  Set tray aside.
 
Preheat the oven to 350 degrees.  

In a small sauce pan, melt the butter, chocolate, and brown sugar over low heat, stirring frequently to combine.  When the mixture is smooth and melted, remove the pan from the heat to cool for a few minutes.  

In a small bowl, combine the flour and the salt, stirring together.  

When the chocolate mixture is cool, stir in the vanilla.  Crack the egg into a separate small bowl.  Using a fork, lightly beat the egg.  Add the egg to the chocolate mixture, stirring until well blended.  Add in the flour, stirring until it is incorporated.  The batter will be smooth and glossy.  

Using 2 small spoons, spoon the chocolate batter into each paper-lined well.  Fill each well with 1 teaspoon of batter.  It will not look like much in each well, but you will have enough to fill 24 mini wells.  Place the tray into the preheated oven, baking for 12 minutes.  Remove the tray from the oven.  Cool for 20 minutes.  

Optional chocolate glaze:
Working with a small heat-proof bowl, place the chocolate into the bowl.  Place in the microwave.  Heat for 11 seconds, stirring after each time, until the chocolate is melted and smooth.  This will take several times to melt the chocolate.  When the brownie buttons are cool, use a small spoon to fill a bit of melted chocolate on to each brownie.  Top the melted chocolate with finely chopped nuts or rainbow sprinkles if desired.  Allow to the chocolate to cool and set up.