Pages

Wednesday, December 20, 2023

ChezCindy: Savory Butternut Squash Galette


 This lovely Butternut Squash Galette is so versatile. Delicious as a main course served along with a crisp green salad.  Or, served as a first course as part of a festive dinner.  I would also eat this for breakfast perhaps with a side of scrambled eggs.  Double down with a slice of the galette along with a bowl of my Spicy Butternut Squash soup from this recipe.  

Use your favorite pie crust recipe or even a store-bought pie dough for a shortcut.  Thinly sliced butternut squash, and thinly sliced red onion are a delicious pairing, along with goat cheese and fresh herbs make a wonderful base filling.  But the real secret here is the smoked paprika.  It makes all the difference.   


Savory Butternut Squash Galette

Filling Ingredients
4 ounces goat cheese, room temperature
1 tablespoon finely chopped fresh chives
2 teaspoons fresh thyme leaves, divided
2 teaspoons salt, divided
2 heaping cups thinly sliced butternut squash, peeled
1 heaping cup thinly sliced red onion
2 tablespoons olive oil, divided
1 heaping teaspoon smoked paprika
1 egg, lightly beaten for egg wash

Pie Dough for 1 9-inch crust

Preheat the oven to 375 degrees.  Line a large baking sheet with parchment paper, set aside.

Make the herbed goat cheese by combining the goat cheese, chives, 1 teaspoon of thyme leaves, and 1/2 teaspoon of salt in a small bowl, mixing well.  Set aside.

In a large bowl, add in the thinly sliced butternut squash, onion, 1 tablespoon olive oil, remaining 1 teaspoon of thyme leaves, and 1 teaspoon salt.  Toss together to coat the vegetables.   

Roll out the pie dough on a lightly floured surface into a 12-inch round.  Transfer the dough to the parchment lined baking sheet.  Dollop the goat cheese mixture over the dough, spreading to cover the dough leaving a 2-inch boarder around the edges.  

Transfer the butternut squash and onion mixture into an even layer over the goat cheese.  Fold the crust up and over the edge of the squash/onions, pleating to form a border encasing the vegetables.  Make the egg wash, then brush the pleated crust with the wash.  Sprinkle the crust with the remaining 1/2 teaspoon of salt.  

Place the baking sheet into the refrigerator to chill the galette for 10-15 minutes.  Place the galette into the preheated oven, baking for 35-40 minutes.  To test for doneness, carefully pierce the squash with the tip of a paring knife.  It should be tender with no resistance. Remove from the oven, letting rest for 5-10 minutes.  Drizzle the filling with olive oil.  Serve hot or at room temperature.  


Thursday, October 26, 2023

ChezCindy: Spice Rubbed Salmon with Honey Roasted Vegetables


This lovely salmon dinner comes together in less than 30 minutes and has minimal cleanup.  A dish elegant enough for company or for a weekday family dinner.  How great is that?  

The spice rub is a delicious compliment to the salmon, but the real star is the drizzle of honey over the fish and the vegetables at the completion of cooking.  Don't skimp on the full amount of honey called for in the recipe or it just won't have the same pizzaz.  The vegetables can be switched up, with the photo showing carrots and asparagus.  I have also used cut zucchini or Brussels sprouts cut in half or quarters, along with the carrots.  It is key to cut the vegetables as noted in the recipe so that the salmon and the vegetables cook in the same amount of time.  


Spice Rubbed Salmon with Honey Roasted Vegetables
3 tablespoons olive oil, divided
4 6-ounce portions of salmon
2 small zucchini (cut into 1-inch pieces) or 1/2-pound asparagus (cut into 2-inch pieces)
2 medium carrots, peeled, thinly cut into 1/4-inch rounds
1 large clove garlic, minced
5 teaspoons honey

Spice Rub for the Salmon
2 teaspoons kosher salt
1 teaspoon smoked paprika
1 teaspoon onion powder
1 teaspoon garlic powder
1 teaspoon dry mustard powder
1 teaspoon dried oregano

Serves 4

Preheat the oven to 425 degrees.  Prepare a large sheet pan with sides by lining it with foil.  Drizzle 1 tablespoon of oil over the foil, rubbing it evenly to distribute the oil.  Set aside.

Make the spice rub for the salmon by combining the salt, smoked paprika, onion powder, garlic powder, dry mustard, and oregano in a small bowl.  Stir to combine.  Set aside.

Place the portions of salmon, skin-side down, onto the center of the prepared sheet pan, leaving space between each piece, about 1/2 inch apart.  Drizzle 1 tablespoon of oil over the salmon pieces.  Sprinkle 1 teaspoon of the spice rub over each piece of salmon. 

Prepare the vegetables as noted in the ingredient list.  It is important to cut the vegetables as described so that they cook in the same amount of time as the salmon.  Place the cut vegetables, the minced garlic, and 1 teaspoon of the spice rub into a large bowl.  Drizzle the remaining tablespoon of olive oil over the vegetables, stirring to combine.  Arrange the vegetables around the salmon, but not covering the salmon.  


Place the sheet pan with the salmon and vegetables into the hot oven on the bottom rack, roasting for 15-18 minutes, depending on the thickness of the salmon.  The internal temperature of the salmon should be 125 degrees or feel firm to the touch.  Remove the pan from the oven.  Drizzle the honey over the salmon and the vegetables.  Serve hot.  


Thursday, October 12, 2023

ChezCindy: White Chocolate Oreo Truffles


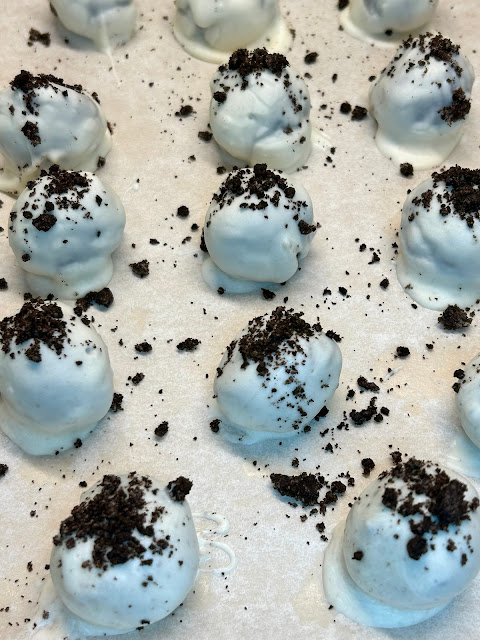
One bite of these White Chocolate Oreo Truffles and all I could manage to say was "wow".  I was speechless and a bit surprised.  I'm not a big fan of white chocolate as it is too sweet for me.  The overall flavor of the truffle achieved from the use of the crushed Oreo cookies, cream cheese, plus a bit of sea salt yielded the perfect bite.  

The recipe is adapted from Jessie Sheehan's Snackable Bakes cookbook.  I have referenced Ms. Sheehan's book in a previous post for the most wonderful peach and vanilla muffins.  Her book is full of so many recipe gems for quick and delicious baking.  Highly recommended.  

The recipe is quite simple and fun to make.  Kids and young bakers will have an easy time creating the truffles.  With minimal finesse, the truffle treats can step in for an impressive make-ahead dessert.  


White Chocolate Oreo Truffles
4 ounces Philadelphia cream cheese, room temperature
1/2 teaspoon sea salt
3/4 teaspoon vanilla extract
18 Oreo cookies
2 cups white chocolate chips
2 tablespoons vegetable oil

Makes about 20 truffles

Place a large sheet of parchment paper onto a large sheet pan.  Set aside.

Add the cream cheese, salt, and vanilla in a large bowl, using a fork, mix together.  Place the cookies into a resealable plastic bag, zip to close.  Cover the bag containing the cookies with a dish towel.  Crush the cookies with a rolling pin until fine crumbs form.  Remove 2 tablespoons of crumbs, setting aside in a small bowl to save for decorating the top of the truffles.  Transfer the remaining cookie crumbs to the bowl with the cream cheese mixture.  Use a rubber spatula to thoroughly combine the crumbs with the cream cheese mixture.  

Use a tablespoon measure to scoop out 1 tablespoon of the cookie mixture.  Use your hands to form into balls.  Place the truffle balls on the prepared sheet pan.  Refrigerate for 20-30 minutes until chilled and firm.

While the truffle balls are chilling, melt the white chocolate and the oil in a heat-proof bowl set over a pan of simmering water (a double boiler), stirring with a rubber spatula to combine.  Carefully remove the bowl of melted chocolate from the pan, setting onto a towel on the counter.  

Drop each chilled truffle ball, one at a time, into the melted chocolate.  Use a fork to coat and to lift the truffle allowing the excess chocolate to drip back into the bowl.  It is helpful to drag the coated truffle along the rim of the bowl to remove some of the excess chocolate.  Place the dipped truffle onto the sheet pan, immediately sprinkling a few crumbs of the reserved cookie crumbs over the truffle.  Repeat with each truffle ball.  Rewarm the white chocolate if it starts to harden while dipping the truffle balls.

Serve the truffles at room temperature.  Keep the remaining truffles in an airtight container in the refrigerator, bringing to room temperature to enjoy.  


Monday, September 25, 2023

ChezCindy: Double Chocolate Kisses & Hugs Cookies


Peanut Butter Blossom cookies were the inspiration for these Double Chocolate Kisses & Hugs cookies.  I wanted to develop a cookie that featured the white chocolate/milk chocolate candy, named by Hershey's as Hugs.  The chocolate cookie dough is one I use during the December Holidays, sprinkling the top with crushed candy canes.  The cookie dough worked perfectly to snuggle in the Hershey's candy for a sweet treat, delicious any time of the year.  


Double Chocolate Kisses & Hugs Cookies
1 1/4 cups all-purpose flour
3/4 cup unsweetened cocoa powder
3/4 teaspoon baking soda
1/4 teaspoon kosher salt
3/4 cup butter-flavored Crisco shortening
1 1/2 cups light brown sugar, packed
2 large eggs, room temperature
2 teaspoons vanilla 

1 15.6-ounce bag of Hershey's Kisses & Hugs candy

Makes about 50 small cookies 

Preheat the oven to 350 degrees.  Have ready 2 large cookie baking trays, or 3 small, lined with parchment paper.  Set aside.

Working with a medium mixing bowl, add in the flour, cocoa powder, baking soda, and salt, gently stirring to combine.  Set aside.

Working with the bowl of a stand-mixer or using a large mixing bowl and an electric hand-mixer, add in the shortening and brown sugar, mixing together to combine until creamy.  Add in the eggs, one at a time, mixing until just combined.  Mix in the vanilla.  Turn the mixer off, add in the flour.  Starting slowly, mix the ingredients to combine until they just come together, not to overmix.  Allow the cookie dough to rest on the counter for 20 minutes.  While the dough is resting, remove the foil cover from 50 of the Kisses & Hugs candy.  Set aside.  

Using a tablespoon or a small spring-loaded scooper, scoop out the cookie dough, placing the cookie ball onto the cookie baking tray.  Place the cookies into the preheated oven, baking for 8 minutes.  Remove the cookie sheet from the oven.  Working quickly but carefully, place one chocolate candy into the center of each cookie.  Leave the cookies on the sheet pan for 1 minute.  Then, slide the parchment paper with the cookies onto the counter to finish cooling.  


Friday, September 8, 2023

ChezCindy: Chicken Parmesan Cheeseburgers


If you are looking for a dinner that is delicious, fun, and just a bit indulgent, try this Chicken Parmesan Cheeseburger on Focaccia.  Classic Chicken Parm is usually a breaded chicken cutlet served with Italian red sauce and a blend of melted mozzarella, a sprinkling of Parmesan cheese, often served with spaghetti.  Delicicious in all ways.  In this recipe, I use ground chicken, Italian seasoning and cheeses to make and Italian Cheeseburger!   


Italian Chicken Parmesan Cheeseburgers
12 ounces ground chicken
1/4 cup grated zucchini, excess liquid squeezed out 
1 tablespoon grated onion
1 large garlic clove, finely minced
1 heavy tablespoon marinara sauce
1 tablespoon fresh grated Parmesan cheese 
1 tablespoon chopped parsley   
1 teaspoon kosher salt
small pinch of black pepper or red pepper flakes

Burger Topping 
1/4 cup marina sauce, divided
3/4 cup fresh grated Fontina cheese
2 tablespoons fresh grated Pecorino cheese, or Parmesan
Fresh basil, torn into small pieces 

Toasted Focaccia Bread as buns, cut into 4-inch squares

Makes 2 burgers, recipe can be doubled

Place the burger ingredients into a medium size bowl.  Using a fork, toss all the ingredients together until well combined.  Divide the mixture into 2 equal parts forming into large flat patties, placing each patty onto a small square of wax paper or parchment paper.  The mixture will be quite sticky and moist.  The paper squares will help to transfer the burgers to the pan for cooking.  

Place a large nonstick skillet over medium-high heat.  Add 1 tablespoon of oil to the skillet to heat for 1 minute.  Pick up one burger and the paper, placing the burger meat-side down, peeling off the paper once the burger is in the pan.  Repeat with the second burger.  Cook on side one for 6-7 minutes until this side is well browned.  Flip the burgers to cook side two, cooking for 2-3 minutes.  Add 2 tablespoons of marina sauce to the top of each burger.  Generously top each burger with the shredded cheese, cover the pan with a lid to melt the cheese and to finish the cook time on the burgers, another 2 minutes.  The burgers should read as 160 for the internal temperature.  


Meanwhile, toast the focaccia squares to have waiting and ready for the cheeseburgers.  Place burgers onto the focaccia buns, sprinkling with the torn basil.  Serve with additional marina sauce on the side if desired.  


Monday, August 28, 2023

ChezCindy: Strawberry Jalapeno Salsa


This Strawberry Salsa came from the need to use up extra fruit I had left over from a cake I made over the weekend.  I did not want to make another sweet treat but was puzzled in how strawberries could be used in a savory dish.  A quick search of the internet pulled back numerous recipes for strawberry salsa, which was new to me.  The ingredients are much the same as the standard tomato salsa.  However, this fruit salsa is lighter and seems more fresh tasting.  There is a hint of sweetness from the berries, and a back-note of heat from the jalapeno pepper.  The key to this balance is to finely mince the pepper and onion.  I served it simply with tortilla chips.  I also think it would be delightful spooned over grilled chicken or pork. 


Strawberry Jalapeno Salsa 
1 1/2 cups strawberries, hulled and cut into small dice
1/4 cup finely diced red onion
1-2 tablespoons finely diced fresh jalapeno pepper, depending upon heat preference
2 tablespoons finely chopped fresh parsley
1 tablespoon thinly sliced fresh basil
1 teaspoon freshly squeezed lime or lemon juice
1/4 teaspoon kosher salt

Prepare all ingredients as instructed.  Combine the ingredients in a small mixing bowl.  Allow to sit at room temperature for 15 minutes.  Serve with tortilla chips or with a cheese and charcuterie board.  
   
Salsa is best when served same day as made.  


Thursday, August 24, 2023

ChezCindy: Cauliflower Steaks Parmesan-Style


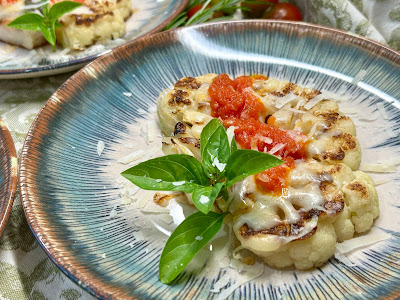
If you are looking for an alternative to Chicken Parmesan, or simply enjoy cauliflower, this recipe might be perfect for you.  My recipe swaps out the chicken replacing it with cauliflower steaks.  The steaks are grilled and are not breaded and fried as a traditional chicken parm.  Each grilled steak is topped with a mix of Italian melting cheese and a drizzle of marinara sauce.  I spiced my sauce with a bit of Calabrian chilies to add a zip to the final dish.  

I used an electric indoor grill unit, a new release from GreenPan, to cook the cauliflower steaks.  You may have a Cuisinart Griddler or even an older George Forman Grill.  All of these will work to make this recipe.  Don't have any of these?  A large cast iron Lodge skillet will do just fine.  


 Cauliflower Steaks Parmesan-Style
1 medium-large cauliflower head
3 tablespoons olive oil
1/8 teaspoon dried oregano
1/8 teaspoon fennel seed
1/8 teaspoon garlic powder
1/2 teaspoon kosher salt
1 cup mix of fresh grated Italian melting cheese (fontina, asiago, and/or provolone) 
2 tablespoons fresh grated Parmesan cheese
1/2 teaspoon Calabrian chilies in oil
1 cup marinara sauce

Cut the cauliflower head into 3 steaks, each being 3/4" thick.  Reserve the remaining bits of cauliflower for another use.  Place the cauliflower steaks onto a large plate.  Set aside.  

Pour the olive oil into a small bowl, adding in the dried oregano, fennel seed, and garlic powder.  Stir to combine.  

Heat an electric indoor grill to high temperature, 425 degrees if your unit has a read-out display.  

Using a small spoon, lightly coat both sides of the steaks with the seasoned oil.  Evenly sprinkle the steaks with the salt.  Place the steaks onto the hot grill, cooking until both sides are deeply cooked with grill marks and the steaks are soft when pierced with the tip of a knife.  


Generously cover each steak with a handful of the grated cheese.  The cheese will melt with the carry-over heat from the grill.  Transfer the steaks to a serving platter.  

Mix together the Calabrian chilies and the marinara sauce.  Lightly drizzle the steaks with the sauce, sprinkling with fresh grated Parmesan cheese.  Serve as a side dish or with pasta. 


Monday, August 7, 2023

ChezCindy: Summer Caprese Salad


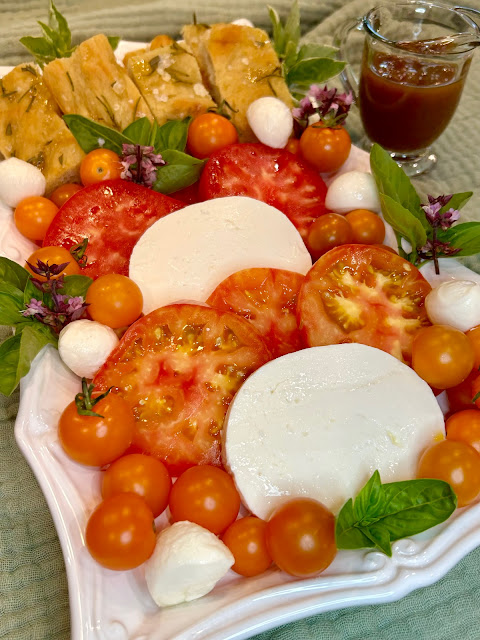
Summer tomatoes are the star of any Caprese Salad, which in turn make you a super star at your next dinner gathering.  A visit to the farm stand for selection of a variety of gorgeous tomatoes is the place to begin.  Add fresh basil leaves and the best fresh mozzarella cheese you can find to complete the list of ingredients.  With barely a recipe at all, this composed salad comes together like a beautiful painting of color.  

A quick note on summer tomatoes:  I highly recommend that your store the tomatoes at room temperature, and never place them in the refrigerator.  Cold tomatoes quickly lose their quality and turn to a mushy texture.  


Summer Caprese Salad
1 pound fresh mozzarella cheese
2-3 pounds variety of fresh farm tomatoes, heirloom if available
1 bunch of fresh basil leaves
Flakey sea salt
Extra Virgin Olive Oil
Balsamic vinegar, optional

Slice the mozzarella into thick slices, setting aside at room temperature.  Slice the tomatoes into thick slices.  Working with a large platter, arrange the tomatoes and the mozzarella slices in an overlapping pattern.  Add a sprinkling of the flakey sea salt.  Generously drizzle with the olive oil.  When ready to serve, tear the basil leaves into pieces, scattering the leaves over the tomatoes and cheese.  If desired, drizzle with a small amount of balsamic vinegar.  Serve at room temperature.  


Monday, July 31, 2023

ChezCindy: Rosemary Parmesan Sourdough Crackers


These homemade Sourdough Crackers are well received every time I serve them.  Most people are surprised that crackers can be made at home.  The recipe is not complicated or difficult.  However, it is necessary to roll out the cracker dough very thinly.  This can be done by using a rolling pin, or if you have a pasta roller, I find that is the easiest method.  Both methods turn out fabulous, crispy crackers.  

I like adding additional flavor to the cracker dough by adding in dried rosemary and Parmesan cheese.  Other options are fennel seeds and red pepper flakes or cracked black pepper and turmeric powder.  The recipe calls for unsalted butter, but you could use olive oil, or even vegan butter works very well.  To maintain vegan crackers, I have used nutritional yeast and Nooch vegan cheese.   


Sourdough Crackers
1 cup all-purpose flour
1/2 teaspoon sea salt
1 cup (227g) sourdough starter discard
4 tablespoons unsalted butter, room temperature
1 tablespoon dried herbs or seeds (rosemary, basil, fennel, caraway) optional
2 tablespoons finely grated Parmesan cheese, optional

additional sea salt for sprinkling on top

Mix together the flour, salt, sourdough discard, butter, and herbs/cheese if using, to make a dough.  This can be done in a large bowl with a wooden spoon, or in your stand mixer.  The dough comes together quickly and easily.  Transfer the dough to your counter shaping it into a rectangle.  Divide the dough into 2 equal parts.  Wrap each portion in plastic wrap and refrigerate for minimum of 30 minutes or up to 3 days.  

When ready to bake, preheat the oven to 350 degrees.  Working with 1 portion, leaving the second in the refrigerator, place the dough onto a large sheet of parchment paper that has been sprinkled with flour to prevent sticking.  Flour the rolling pin to begin flattening and rolling the dough into a large rectangle, to 1/16" thick.  Or use a pasta roller to roll the dough into long pieces as you would pasta dough.  Using a pastry wheel or a sharp knife, cut the dough into 1/2" - 1" squares, triangles, or rectangles.  


Place the cut crackers onto a parchment lined baking sheet.  Sprinkle lightly with additional sea salt.  Place the baking sheet in the oven on the center rack.  Bake the crackers for 17-20 minutes, rotating the pan half-way through the baking time for even baking.  Remove the baking sheet from the oven, transfer the parchment paper onto the counter to cool.  The crackers will be lightly browned and crisp.  


Store the cooled crackers in an airtight container or freeze for longer storage.  


Saturday, June 3, 2023

ChezCindy: Summer Panzanella Salad with Roast Chicken


Whether you roast a whole chicken indoors in your oven, outdoors on a grill, or even store-bought rotisserie chicken, this summer panzanella salad is a wonderful summer dinner.  

A panzanella salad is an Italian dish that uses stale bread made into toasted croutons, along with the best tomatoes available, a few salad greens and herbs tossed with a vinaigrette.  I often add roasted chicken to make a complete meal, being sure to drizzle the chicken pan juices over the platter so that the croutons soak up all of that rich chicken flavor.  


Summer Panzanella with Roast Chicken
Day-old bread, (baguette or country boule) cut into 1-inch cubes, 3 cups
3 tablespoons olive oil
1 teaspoon kosher salt

3 cups mixed salad greens
5-6 sprigs fresh herbs, basil, thyme, tarragon and/or parsley, leaves removed from stems

4 medium tomatoes, cut into quarters or 2 cups cherry tomatoes
1/2 teaspoon kosher salt

6-8 tablespoons vinaigrette, homemade or store-bought

1 roast chicken, with pan drippings

Parmesan cheese curls, about 1/3 cup

Make the croutons:  Preheat the oven to 425 degrees.  Working with a large, rimmed sheet pan, place the cubed bread onto the pan.  Drizzle the cubes with olive oil, and sprinkle with salt.  Using your hands, toss to combine.  Spread the cubes evenly over the sheet pan.  Bake in the oven until toasted and brown, about 10-12 minutes.  Remove from the oven and set aside.  

Make the vinaigrette.  Roast the chicken, keep warm.  Or use store-bought.  

Putting it all together:  Place the croutons onto a large serving platter.  Cut the roast chicken into pieces (leg, thigh, wing, each breast cut into 2 pieces).  Place the chicken onto the croutons.  Season the tomatoes with salt, then scatter over the platter.  Drizzle 1/4 cup, or more up to 1/2 cup, of chicken pan drippings over the chicken and croutons.  Add the salad greens and fresh herb leaves to the platter.  Drizzle 4-5 tablespoons of vinaigrette over the salad, tomatoes, chicken and croutons.  Top with the Parmesan cheese curls.  Serve with additional vinaigrette if desired.  


Wednesday, May 24, 2023

ChezCindy: Butterflied Grilled Chicken with Herb Butter


Fresh herbs from the garden mixed with sweet creamy butter is a wonderful addition to grilled chicken to enjoy dining outside on a warm Spring Day.  

Here I used a whole chicken that I "butterflied" to open it up to expose the cavity and lay flat on the grill grates.  Individual pieces of bone-in chicken would work great too.  Basting with the herbed butter at the last minute before removing from the grill will create a lovely sauce to compliment the natural chicken juices.  


Butterflied Grilled Chicken with Herb Butter

1 whole chicken, 4-5 pounds, butterflied
    or bone-in pieces, leg quarters and/or breast 
1 tablespoon oil
1 tablespoon kosher salt

1 stick unsalted butter, softened 
4-5 large sprigs of various herbs
    tarragon, rosemary, basil, and/or thyme
1 teaspoon kosher salt

Light the grill to preheat to a temperature of 400-425 degrees using the indirect heat method for either gas or charcoal.   

Make the herb butter:  Place the softened butter into a small bowl.  Remove the leaves of the herbs from the stems, chopping the leaves into small pieces.  Add the chopped leaves to the bowl with the butter, along with the teaspoon of salt.  Mix to combine.  

Prepare the chicken for grilling:  Using paper towels, pat dry the chicken on the top skin and bottom cavity.  Brush or rub the skin of the chicken with the oil.  Sprinkle the tablespoon of salt over the entire chicken.  Transfer to a large sheet tray to transition to the grill.  Once the grill is hot, place the chicken cavity side down over indirect heat onto the grill grate.  Close the lid and grill undisturbed without turning, moving, or opening the lid for 25-30 minutes.  Watch for flair ups so that the chicken doesn't burn.  Cooking over indirect heat should minimize flair ups.  We are grilling the chicken on one side, not flipping over, remaining skin-side up for the entire cooking time. 

At 25-30 minutes, begin checking the internal temperature.  Once the chicken reaches 150 degrees at the thickest part, the skin should be nicely browned at this point.  Add 2-3 tablespoons of the herb butter to the top of the chicken.  With the lid open, continue cooking until the chicken reaches 160 degrees.  Remove the chicken to a clean sheet tray or serving platter.  Carry-over cooking while resting the chicken for 5-7 minutes will continue bringing the chicken to 165 degrees.  Serve with additional herb butter dolloped on the chicken.  


Friday, May 12, 2023

ChezCindy: Spinach and Green Onion Quiche Tart


This recipe for Spinach and Green Onion Quiche is nearly foolproof.  Additionally, the ingredients can be switched up to meet your preference substituting kale, collards, or Swiss chard for the spinach and diced red onions or caramelized yellow onions for the chopped green onions.  I used freshly grated gruyere cheese, but white cheddar or Swiss cheese would be delicious too.  

The homemade crust is made in a food processor using a blend of butter flavored Crisco and unsalted butter.  Or you could easily use a store-bought crust to save time.  This dish is definitely a make it your own and make it ahead for any upcoming springtime events such as Mother's Day, a graduation gathering, or wedding shower.  


Spinach and Green Onion Quiche Tart
    Makes one 9-inch tart

For the Crust:
2 cups all-purpose flour, extra as needed
1 teaspoon kosher salt
1 teaspoon sugar
1/2 cup butter flavored Crisco shortening
1/2 cup cold unsalted butter (1 stick) cut into 1/2-inch cubes
scant 1/2 cup ice-cold water


For the Filling:
3 tablespoons unsalted butter, divided
1 tablespoon olive oil
1 large bunch green onions, cut into 1/2-inch pieces
4 cups raw spinach leaves, loosely packed
1 tablespoon all-purpose flour
2 large eggs
2/3 cup heavy cream
1 teaspoon kosher salt
freshly grated nutmeg (optional)
2 ounces gruyere cheese, grated (about 1/2 cup)


Begin by making the dough: 
Working with a food processor, pulse the flour, salt and sugar to combine.  Place the shortening and the cubed butter in with the flour mixture.  Pulse until the butter is the size of pearls.  Open up the liquid feed tube on the processor top to begin drizzling in half of the cold water, pulsing to combine.  Add more water a small amount at a time, pulsing to combine until the dough comes together.  You don't need a full half cup, just slightly less than.  Transfer the dough to a lightly floured surface.  Press it together to form a disk about 4-5 inches wide.  Wrap in plastic and refrigerate for 30-40 minutes.  

Butter a 9-inch tart pan with a removable bottom.  Working with the now chilled dough, remove it from the plastic wrap placing the disk onto a lightly floured surface.  Using a rolling pin, roll out the dough into a thin 13-inch circle.  Drape the dough circle over the tart pan pressing it into the bottom and sides.  Using the rolling pin or a knife, cut off the excess dough.  You will have extra dough for another use.  Use a fork to poke evenly spaced holes in the bottom of the dough.  Place the tart pan in the freezer to chill for 15-20 minutes.  Preheat the oven to 400 degrees.  

Place the chilled tart onto a baking sheet.  Line the tart pan with crumpled foil to cover the bottom of the pan with some foil hanging over the sides.  Fill the foil-lined pan with pie weights (I use dried beans that I store for repeated use).  Bake the dough for 15 minutes.  Remove the tart from the oven, carefully remove the foil containing the pie weights.  Return the tart to the oven to continue baking for about 5 minutes until the tart dough is lightly browned.  Remove from the oven to cool while you make the filling.  Reduce the oven temperature to 375 degrees.

  
While the tart dough is cooling, make the filling:
Working with a large 11-inch skillet over medium heat, melt 2 tablespoons of butter with the olive oil.  Add in the chopped green onions, stirring to combine.  When the onions are beginning to soften, add the spinach, tossing all together.  Continue stirring until the spinach is wilted and the onions are soft.  Stir in the tablespoon of flour.  Set aside to cool.  Cut the remaining tablespoon of butter into 6 tiny pieces, set aside.  

In a large bowl, whisk to combine the eggs, cream, salt and nutmeg if using.  Fold in the cooled spinach and green onion mixture along with half of the grated cheese.  Transfer the egg mixture to the cooled tart shell, smoothing the top to evenly distribute the spinach and green onions.  Scatter the remaining cheese evenly over the top.  Scatter the 6 tiny pieces of butter over the cheese.  Bake the tart placing it on the lowest oven rack at 375-degrees for 25-30 minutes until the tart is puffed and lightly browned.  Place the baked tart onto a wire rack to cool.  Remove the tart ring.  

Serve warm or at room temperature.  


Sunday, April 30, 2023

ChezCindy: Spring Roasted Chicken with Tarragon Butter


Melissa Clark, columnist for the New York Times Food section, recently posted a recipe for Roast Tarragon-Cognac Chicken as adapted from a recipe submitted by a reader.  Honestly, I knew the recipe would be delicious from the list of ingredients and the simple roasting process.  But once I made it and served it for dinner, I quickly realized this recipe turned out one of the best roasted chickens I have ever made.  Really.  

Tarragon is one of my favorite herbs that I cherish each Spring when it first sprouts from the earth as a perennial herb returning each year as a gift.  You might know tarragon from Steak Oscar with asparagus and crab and Bearnaise sauce where tarragon is the key ingredient for the Bearnaise.  I do think this roast chicken recipe is best as a Spring dish when tarragon is fresh from the garden with no heavy gravy like a traditional Thanksgiving meal.  The pan drippings from this roasted chicken are lighter and brighter.  

Check out the original recipe.  Or use my recipe with slight changes as shown below.  


Spring Roasted Chicken with Tarragon Butter and Cognac

1 4-pound whole chicken
2 teaspoons kosher salt, divided
6 tablespoons unsalted butter, softened
1/4 teaspoon white pepper
1/2 cup fresh tarragon, coarsely chopped
2 tablespoons Cognac, divided
1 cup homemade chicken stock
1 tablespoon Wondra flour

Preheat the oven to 425 degrees.  

Pat the chicken dry with paper towels.  Sprinkle 1 1/2 teaspoons kosher salt inside the cavity and over the outside of the chicken.  Place the chicken into a small roasting pan to fit the size of the chicken.  You could use a 11-inch cast enamel pan with shallow sides or a lasagna pan.   

In a small bowl, combine the butter, white pepper, tarragon and 1 tablespoon of Cognac, mixing well.  The Cognac may not fully incorporate.  Rub half of the butter mixture under the skin of the chicken, being sure to reach down to the legs and thighs, as well as the breasts.  Divide the remaining half of the butter mixture into the cavity of the chicken and over the outer skin of the chicken.  Pour any of the remaining Cognac that did not mix in with the butter into the cavity of the chicken.  Place the baking pan with the chicken into the hot oven, roasting for about 1 hour until the internal temperature reaches 160 degrees.  Remove the pan from the oven.  Turn off all sources of heat on your stove, including the oven and burners.  Pour the remaining tablespoon of Cognac over the chicken, basting the chicken with the pan juices.  Remove the chicken to your serving platter.  

Place your baking pan with the pan drippings over medium heat on the stovetop.  Pour in the chicken stock.  Bring all to a shallow boil.  Sprinkle in the Wondra flour, whisking to combine.  Taste to adjust for seasoning, adding salt or pepper as needed.  Serve the pan drippings with the carved roasted chicken with buttered mashed potatoes and a green vegetable if desired.  


Tuesday, April 4, 2023

ChezCindy: Pretty Spring Asparagus Tart


This beautiful Spring Asparagus Tart is super easy to make and is equally delicious as it is easy.  My favorite shortcut trick is to begin with using frozen puff pastry which I most always have in my freezer.  The ingredients in the recipe might be items you already have available in your fridge and pantry, with a few fresh items to pick up from the store.  And right now, we are getting early asparagus that it is quite good, just in time for a Spring buffet or lunch.  To make the tart even more beautiful, I had a few edible flowers on hand from my Chef's Garden vegetable delivery to add to the finished tart.   


Spring Asparagus Tart
4-ounces goat cheese or cream cheese, softened at room temperature
1 large egg, lightly beaten
1 large garlic clove, finely minced
2 teaspoons lemon zest
1 teaspoon sea salt, plus more for serving
1 cup creme fraiche or full fat yogurt
1 sheet thawed puff pastry, such as Pepperidge Farm
6-ounces thin asparagus, woody ends removed
2 tablespoons olive oil
3 tablespoons fresh grated Parmesan cheese
1-ounce Parmesan cheese, shaved with a vegetable peeler, as garnish
additional salt, pepper, olive oil to finish

Preheat the oven to 425 degrees.  Working with a medium size bowl, add in the goat cheese, egg, minced garlic, lemon zest, and salt.  Using a fork, mash the ingredients together.  Add in the creme fraiche or yogurt, whisking to combine until smooth.  

Place large sheet of parchment paper onto the countertop.  Place the puff pastry onto the parchment paper, using a rolling pin to roll out the pastry to an 11x13-inch rectangle.  Place the parchment paper with the pastry onto a large, rimmed sheet pan.  Use a small paring knife to lightly score a 1/2" border around the edges of the pastry.  

Spread the goat cheese mixture evenly inside the scored border.  Place the trimmed asparagus lined up across the pastry.  Using a pastry brush, lightly brush the asparagus with the oil.  Sprinkle the grated Parmesan cheese evenly over the asparagus.  

Bake the tart in the hot oven for 25-28 minutes until the pastry is puffed and golden.  Remove from the oven allowing the tart to cool for about 5 minutes.  Scatter the shaved Parmesan cheese curls over the asparagus.  Sprinkle with a bit of salt and pepper to taste, with an additional drizzle of olive oil.  Cut into large squares, serving hot or warm.  


Recipe is adapted from Melissa Clark cookbook, Cooking in French

Sunday, February 26, 2023

ChezCindy: Shortcut Italian Shrimp Risotto


A delicious one-pan Shrimp and Rice recipe using Italian arborio rice becomes an easy weeknight dinner.  

Standard process when using arborio rice to make risotto requires 20 minutes of continuous stirring while adding warm stock.  I generally don't mind this process as it is somewhat meditative to stir while enjoying a glass of wine.  However, this quick cooking method came out wonderfully well in about the same amount of time with much less hands-on engagement.  Dinner that is pretty, quick, and delicious.  


Shortcut Italian Shrimp Risotto
2 tablespoons olive oil
2 small shallots, chopped (about 1/4 cup)
1 14-ounce can of whole plum or cherry tomatoes, drained
2 teaspoons kosher salt, divided
1 cup arborio rice
1/4 cup dry white wine
1 1/2 cups unsalted chicken broth
1/4 cup water
1-pound large shrimp, peeled and deveined (13-15)
3/4 teaspoon dried oregano
1/4 teaspoon dried red pepper flakes
3 cups fresh baby spinach
1/4 cup chopped basil


Working with a large, (10-11-inches) straight-sided pan over medium-high heat, add in the oil and heat for 30 seconds.  Add in the chopped shallots, stirring for 1 minute until softened.  Add in the drained tomatoes and 1 teaspoon of salt, stirring and crushing the tomatoes with a rubber spatula or wooden spoon. Cook for 2-3 minutes.  Stir in the arborio rice, stirring to coat each grain, cooking for about 3 minutes until lightly toasted.  Stir in the white wine, cooking until it is nearly evaporated.  Add in the chicken broth, water, and 1/2 teaspoon salt, bring to a boil, then reduce the heat.  Cover the pan, cooking at a low simmer for 10 minutes.  The rice will not be cooked through as yet.  

Season the shrimp with the remaining 1/2 teaspoon salt, oregano and pepper flakes. Place the shrimp into the pan, nestle each one-by-one into the par-cooked rice.  Add in the spinach, cover and continue cooking for 7-8 minutes.  The shrimp will turn pink in color still tender to the touch and the spinach will be bright green and wilted.  Remove the pan from the heat, sprinkle with the chopped basil and serve.  


Friday, February 24, 2023

Chez Cindy: Rainbow S'mores Rice Krispies Treats


This is a fun mash-up to two favorite sweet treats!  S'mores and Rice Krispies Treats.  Bring this dessert to your next family gathering and even the adults will smile with joy.  

I created this recipe for a Young Chefs cooking class I recently taught at The Seasoned Farmhouse.  The kids loved making it and eating it!  The recipe starts with the standard Rice Krispies Treats process, but added to the cereal mix is a full pack of graham crackers broken into small bits.  Of course, chocolate and marshmallows are added to complete the full S'mores flavor.  Adding rainbow sprinkles makes any day a party.  


Rainbow S’mores Rice Krispies Treats

What you will need:  
3 tablespoons unsalted butter 
8-ounces large marshmallows
1 pack graham crackers (from a 14.4-ounce box containing 3 packs)
5 cups Rice Krispies cereal

Toppings
2 cups mini marshmallows
1 cup mini chocolate chips
½ cup rainbow sprinkles


How to make it:

1. Prepare a 9 x 13-inch baking pan by lightly spraying it with baking spray.  Break the graham crackers into ½-inch pieces placing them into a small bowl, set aside.  Measure out all the remaining ingredients, setting them aside.  

2. In a large, deep saucepan melt the butter over medium-low heat.  Add the large marshmallows, stirring frequently until melted.  Remove from the heat to a work surface.

3. Stir in the Rice Krispies cereal and the graham cracker pieces.  Transfer half of the mixture to the prepared baking pan.  Use a small piece of wax paper to spread the mixture evenly into the pan.  

4. Sprinkle half of the toppings, mini marshmallows (1-cup), mini chocolate chips (1/2-cup), and half of the rainbow sprinkles (1/4-cup) spreading evenly over the top.  Press lightly into the cereal mixture.

5. Transfer the remaining cereal mixture over the toppings, again spreading evenly to cover the first layer of toppings.  Sprinkle the remaining toppings over the cereal mixture, pressing them into the top.  

6. Cool for 5-10 minutes until fully set.  Cut into large squares and enjoy.  


Wednesday, February 8, 2023

ChezCindy: Chocolate Lava Cakes


The chocolate lava cake has been an iconic dessert for decades.  It first appeared on the restaurant scene in the late 1990s.  Chef Jean-Georges Vongerichten is primarily given credit for the creation of the dish.  Some even saying it was the result of an error in the kitchen having underbaked the cake.  Once served, the cake became a popular "mistake" and one of the most popular and copied desserts across the nation.    

The recipe is surprisingly easy and can also be made ahead of time, with the unbaked cakes stored in the refrigerator until ready to bake and serve.  The trick to serving the cake is having confidence in inverting the ramekin to release the cake on to the serving plate.  Be bold.  You can do it.  


Make-ahead Chocolate Lava Cakes
1 stick unsalted butter (8 tablespoons)
6 ounces bittersweet chocolate, 60% cocoa butter
2 whole eggs
2 egg yolks
¼ cup sugar
Pinch of salt
2 tablespoons all-purpose flour

Preheat the oven to 400 degrees.  Butter and lightly flour 4 6-ounce ramekins, placing on a sheet pan.  Set aside.

Working with a double boiler over simmering water, melt the butter with the chocolate stirring to combine.  Remove the top pan from the double boiler and set aside to cool slightly.  

In a medium bowl using a hand mixer, or in the bowl of a stand mixer, beat the eggs with the egg yolks, sugar and salt on high speed until thickened and pale.  This will take about 4-5 minutes.  

Using a rubber spatula, fold the chocolate mixture into the egg mixture, folding in the flour additionally until just combined.  Spoon the batter into the prepared ramekins, dividing the batter equally among each.  At this point, the cakes can be kept at room temperature for 1 hour or stored in the refrigerator for 1-2 days before baking.  If kept in the fridge, bring to room temperature for 30-40 minutes before baking.  


Place the sheet pan with the filled ramekins into the hot oven, baking for 8-11 minutes, depending on how soft you prefer your cake.  Bake less time for a more fluid lava texture.  The sides of the cakes will be firm with the center being soft and still very shiny.  Remove the sheet pan from the oven.  Let the cakes cool for 30-60 seconds.  

Place the serving plate on top of the ramekin.  Using a towel to protect your hands from the hot ramekins, carefully and with confidence, invert the ramekin and plate, allowing the cake to drop onto the plate.  Let the ramekin stand in place for 15 seconds, then remove it to reveal the cake.  Serve immediately.  Vanilla ice cream and raspberry sauce are a nice accompaniment to the chocolate cake. 


Sunday, February 5, 2023

ChezCindy: Sweet Glazed Chocolate Chip Scones


February brings thoughts of chocolate.  This indulgent scone, filled with chopped chunks of rich chocolate, glazed with a sweet sugar-cream glaze, fulfills all chocolate dreams.  Perfectly paired with a glass of Brut Champagne, but equally lovely with your morning coffee.  

The recipe is based on one from a cookbook titled Chocolate Passion by Trish Boyle and Timothy Moriarty.  The contents of the book present a history of, great information about, and recipes for every type of chocolate.  I have spent a lot of time with this book.  

Making this recipe yields 16 large scones.*   The baked scones can be frozen before glazing.  Allow the scones to come to room temperature before adding the glaze.  If not eaten soon after baking, I recommend warming them in the oven or microwave briefly to slightly melt the chocolate.  


Sweet Glazed Chocolate Chip Scones
4 cups all-purpose flour
5 teaspoons baking powder
1 teaspoon fine sea salt
3/4 cup cold unsalted butter (1 1/2 sticks)
1 cup powdered sugar
1 cup heavy cream
4 large eggs, cold
1 tablespoon vanilla extract
16-ounces dark chocolate, 60% cocoa, such as Ghirardelli 4-ounce bars

Sweet-Cream Glaze
1 cup powdered sugar
3-4 tablespoons heavy cream

*Recipe is suitable to make half the recipe to yield 8 large scones.

Preheat the oven to 400 degrees.  Line 2 large sheet pans with parchment paper.   Hand cut the chocolate bars into small, ragged pieces, using a large knife.  Set aside.

In a large mixing bowl, add in the flour, baking powder, and salt, whisking to combine.  

Cut the cold butter into small 1/2-inch pieces, adding them to the flour mixture.  Using your hands, toss the butter pieces to coat each piece in flour.  Using a pastry cutter or your fingers, cut or rub the butter into the flour mixture until the butter is the size of small pearls.  Stir in the sugar to combine.  

In a separate medium bowl, add in the cream, eggs, and vanilla, whisk to combine.  Pour the egg mixture into the flour mixture, stirring to combine.  Stir in the chopped chocolate. The dough will be lightly sticky and shaggy.  Turn the shaggy dough onto your work surface, kneading a few times until the dough comes together.  Divide the dough into 2 equal parts.  Form each piece into a 7-inch round disk.  Place each disk onto the parchment lined sheet pans.  Cut each disk into 8 pie-shaped wedges, without cutting through the parchment paper.  Separate each wedge slightly apart to allow the scones room to expand and puff up.    

Bake the scones 1 sheet pan at a time for 18 minutes.  Keep the waiting pan with unbaked scones cold by placing the pan into the refrigerator or freezer.  Bake until the scones are lightly browned and slightly springy to the touch.  Remove the pan from the oven, keeping the scones on the pan for 1 minute.  Then transfer the scones to a cooling rack.  Bake the second tray.  

Make the sugar-cream glaze, drizzling when the scones have cooled.  


Sugar-Cream Glaze
Add the powdered sugar into a small bowl.  Add in 2-3 tablespoons of cream, whisking to combine, adding more cream a little at a time, until the mixture is slightly thin and pourable.  Drizzle over the scones.   


Sunday, January 29, 2023

ChezCindy: Carrots & Leeks with Honey-Vinegar Glaze


Vegetables in winter can be kind of ho-hum.  I was looking at the choices in my vegetable drawer, knowing that I had rainbow carrots.  I have been making my standard glazed carrots recipe, which is very good.  When I spotted the leeks buried under various lettuces and such, I knew I had a chance to shake things up.  The leeks added a mellow sweet onion flavor in complement to the carrots.  Plus, their vibrant green color was gorgeous against the variety of rainbow carrot colors.   To add balance to the dish overall, I deglazed the pan with honey and a bit of apple cider vinegar.  Serving the carrots with a rich roasted meat such as a roast chicken or braised short ribs provides the perfect side dish.  


Glazed Carrots and Leeks

1 pound rainbow carrots
1 large leek
2 tablespoons unsalted butter
2 tablespoons olive oil
3 cloves garlic
1 teaspoon kosher salt
1/4 cup water
2 tablespoons honey
2 tablespoons apple cider vinegar
chopped fresh parsley for garnish


Prepare the vegetables:  Peel the carrots, cutting each carrot on the bias down the length of the carrot to create angled pieces about 3-inches long.  Cut the leek lengthwise down the middle to open it up to thoroughly wash the interior of the leek layers.  Cut away the dark green leaves, discarding them.  Once clean, cut across the leek into 1-inch pieces, using only the white and light green sections.  Smash the garlic cloves to remove the skins, then mince into tiny pieces.  


Working with a large 11-inch heavy bottomed skillet, such as Le Creuset or Lodge, over medium-high heat, add in the butter and oil, swirling the pan to combine.  Add in the cut carrots, stirring to coat in the butter/oil.  Cook the carrots for about 5 minutes, stirring occasionally.  Add in the cut leeks, stirring to combine.  Sprinkle in the salt, continue cooking the carrots and leeks for another 5 minutes.  Add in the garlic, cooking for 1 minute.  Carefully add in the water, cooking until the water is cooked down to almost completely gone.  The pan should look saucy, and the carrots and leeks should be tender.  If they are not tender, add 2 tablespoons of water and continue cooking.  When the carrots are tender, add in the honey and vinegar, stirring to combine to glaze the vegetables, cooking for 1-2 minutes.  Remove from heat and garnish with the chopped parsley.