Pages

Wednesday, December 14, 2022

ChezCindy: Whole Roasted Cauliflower with Browned Butter Sauce


Roasting a whole head of cauliflower for dinner can present a dramatic moment equal to serving a whole roasted chicken.  Each are browned and gorgeous in their own way.  You can even "carve' the cauliflower at the dinner table as you would the roast chicken.  

The cauliflower is smeared with a mayonnaise-mustard mixture, giving it fantastic flavor, as well as yielding the beautiful bronzing.  I like the contrast of textures gained by adding toasted walnuts to the browned butter, offering great crunch against the soft flesh of the vegetable.  The cauliflower can be served as a side dish, or as the main dish with a side of orzo pasta or rice.  


Whole Roasted Cauliflower with Walnut & Capers Browned Butter Sauce
1 medium head cauliflower, about 2-pounds
1 teaspoon kosher salt
1/3 cup mayonnaise
2 teaspoons Dijon mustard
2 teaspoons fresh thyme leaves
6 tablespoons unsalted butter
1/2 cup toasted chopped walnuts
2 tablespoons capers, drained

Preheat the oven to 400 degrees.  Line a sheet pan with foil.   

Trim the stem end of the cauliflower, removing the leaves.  Using a paring knife, carefully cut out the core, no more than 2-inches, keeping the whole head intact.  Season the cauliflower with salt, placing it onto the prepared sheet pan.  Tightly cover the whole head with a large piece of foil.  Roast the cauliflower for about 30 minutes.  It will only be partially cooked.  Remove the foil.  Meanwhile, combine the mayonnaise, Dijon mustard, and thyme leaves.  Spread the mixture onto the partially cooked cauliflower, coating it entirely.  Return the sheet pan to the oven, roasting for another 25-30 minutes until evenly browned and tender when pierced with a fork.  Remove from the oven and set aside.

In an 8-inch skillet, melt the butter over medium heat, swirling and stirring until the butter is slightly browned.  Off the heat, add in the chopped toasted walnuts and capers, stirring to combine.  

Cut the cauliflower into large wedges, serve with the browned butter sauce spooned over the top.  


Sunday, November 27, 2022

ChezCindy: One-pan Shrimp Scampi with Orzo Pasta


As much as I enjoyed cooking the Thanksgiving meal this year, washing up all of the pans, skillets, and baking dishes wore me out!  I was looking for a break but still wanted to cook something that did not require so many pans.  Just before the holiday, I had purchased a new cookbook by Melissa Clark, titled Dinner in One - Exceptional & Easy One-Pan Meals.  In this new book was my answer.  

Ms. Clark's latest cookbook is filled entirely with recipes for one-pan meals that I plan on fully exploring.  The first one I tried was her Skillet Shrimp Scampi.  Each recipe includes notes on following the exact recipe or how to make it your own with what you prefer or have available.  And that is exactly what I did here.  I started with the shrimp scampi orzo pasta, but added in arugula greens in two ways, first wilted into the orzo, and then a sprinkling of fresh chopped arugula to finish on top.  I look forward to creating many more of the recipes in this cookbook.  Below is my version of Ms. Clark's shrimp scampi recipe.  


Shrimp Scampi Orzo with Arugula
2 tablespoons unsalted butter
2 tablespoons extra-virgin olive oil
4 cloves garlic, finely chopped
1/4 cup dry white wine
1/4 cup chicken or vegetable broth
2 teaspoons kosher salt, divided
pinch of red pepper flakes
1-pound large shrimp, (U13-15)
1 cup orzo
2 large Roma tomatoes, cut into 1-inch pieces
2 cups fresh arugula, divided

Fresh grated Parmesan cheese for serving
olive oil for serving

Prepare the shrimp by peeling and deveining them, rinsing under cold water.  Place the shrimp onto a paper towel to absorb the extra water from rinsing.  Set aside. 

Working with a 12-inch skillet with a lid, melt the butter, adding in the olive oil, swirling to combine.  Add in the chopped garlic, stirring for 30 seconds.  Add in the wine and broth, 1 teaspoon salt and the pinch of red pepper flakes.  Let this cook for 1-2 minutes to reduce slightly.  

Carefully place the shrimp into the simmering liquid to sauté for 2 minutes.  Using a slotted spoon or tongs, remove the shrimp to a plate.  The shrimp will be partially cooked.  

Add in 2 cups of water and the orzo, along with the remaining teaspoon of salt, stirring to combine.  Cover the pan with the lid, reducing the heat to medium.  Cook the orzo until it is tender, and the liquid is mostly absorbed.  This will take about 8-10 minutes.  Add in a few more tablespoons of water as necessary if the pan dries out before the orzo is tender.  

Return the shrimp and any juices to the pan, adding in the cut tomatoes, cooking for 2 minutes, stirring to combine.  Add in most of the arugula stirring into the pan to wilt, saving 1/2 cup for chopping as a garnish.  Turn off the heat.  Sprinkle the chopped arugula over the orzo and shrimp.  Serve each plate with a bit of freshly grated Parmesan cheese and a drizzle of olive oil.  


Wednesday, November 23, 2022

ChezCindy: Brown Butter Pumpkin Spice Cookies


I love this season of holiday baking.  These past few weeks I have been working through my favorite pumpkin recipes and exploring a few new ones too.  Earlier this month I made my favorite pumpkin scones with brown butter glaze.  Which then reminded me of a cookie recipe in Rececca Firth's cookbook, The Cookie Book, for Brown Butter Pumpkin Cookies.   

As we lead up to Thanksgiving, making the traditional Libby's pumpkin role is a must-do.  And yes, I use their standard recipe, with maybe just a tweak to the cream cheese filling, adding a bit of ginger spice to the mix.  The Brown Butter Pumpkin Cookies from Ms. Firth's book, remind me of the pumpkin roll with similar flavor profile and texture.  Maybe a cross between the pumpkin roll and pumpkin whoopie pies.   

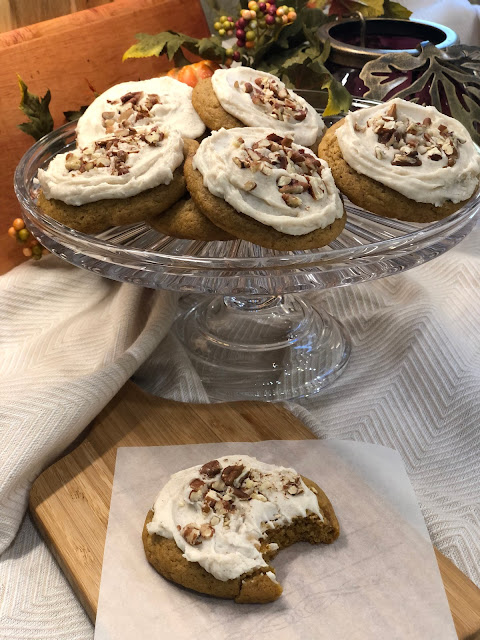
The cookie recipe takes a bit of planning ahead as the cookie dough requires chilling for 30-60 minutes to firm up before baking.  The cookies are worth the wait.  They are soft and pillowy, topped with a creamy spiced frosting.  Below is my take on Ms. Firth's recipe with a few changes.  Her cookbook is wonderful filled with many bake-worthy recipes.  


Brown Butter Pumpkin Spice Cookies
8 tablespoons unsalted butter 
1/2 cup canola oil
1/3 cup pumpkin puree
3/4 cup dark brown sugar, packed
3/4 cup granulated sugar
3 teaspoons vanilla extract
2 large eggs, room temperature
2 3/4 cups all-purpose flour
2 teaspoons baking powder
1 teaspoon baking soda
1 teaspoon sea salt
1 teaspoon cinnamon
1/2 teaspoon ginger
1/4 teaspoon nutmeg
1/4 teaspoon cloves

chopped toasted pecans, optional for topping

Working over medium-high heat, place the butter into a heavy-bottomed saucepan to melt.  Continue heating the butter, stirring occasionally until the butter begins to brown.  This should take about 4-5 minutes.  Once browning begins, remove the pan from the heat, continue stirring as the butter will continue to brown even after off the heat.  It will smell wonderful.  Set aside to cool. 

Transfer the cooled brown butter to the bowl of a stand mixer, adding the oil, pumpkin, both sugars, vanilla and eggs.  Mix until thoroughly blended.   

In a separate medium size mixing bowl, combine the flour, baking powder, baking soda, salt, and spices.  Whisk together to combine.  Add the dry flour mixture to the butter/sugar mixture, using a rubber spatula fold together until just combined.  Cover the mixing bowl with plastic wrap, placing it in the refrigerator until the dough is firm, 30-60 minutes.  

 Preheat the oven to 350 degrees.  Line baking sheets with parchment paper.  

Once the dough is chilled, using a 2-tablespoon spring-loaded scooper, scoop out the cookie dough, forming it into balls.  Place each cookie ball onto the parchment lined baking sheets, spacing about 2 inches apart.  Bake one sheet at a time in the center of the oven for 10-11 minutes.  Remove the baking sheet from the oven, allowing the cookies to cool for 10 minutes before transferring each cookie to a cooling rack.  Continue baking the remaining cookies.


While the cookies cool, make the Cream Cheese Frosting:  

2 tablespoons unsalted butter, softened to room temperature
3 ounces Philadelphia cream cheese, room temperature
2 1/2 cups powdered sugar
1 teaspoon cinnamon
1/4 teaspoon ginger
1/4 teaspoon nutmeg
2-3 tablespoons milk

Add the butter, cream cheese, powdered sugar, and spices to a mixing bowl.  Using a mixer, mix together until smooth.  Add in 1 tablespoon of milk to thin, adding in more until creamy and spreadable.  

Once the cookies are cool, spread a generous portion of the frosting on top of each cookie.  Top with chopped toasted pecans if desired.  


Sunday, November 20, 2022

ChezCindy: Roasted Acorn Squash filled with Caramelized Vegetables and Rice


I created this dish in late summer for a cooking class featuring end of the season harvest.  Working with the farmers market and my go-to farmer, she had what seemed like endless poblano peppers, and zucchini.  Turns out I really like poblano peppers.  My expectation was that they would carry some heat but are a mild flavorful pepper.  So much better than the standard green bell pepper.  

Now that we are in Fall with Thanksgiving looming ahead, I swapped out the zucchini and poblanos for Brussels sprouts and mushrooms.  Think of this recipe as a base to use seasonal vegetables or just what you prefer.  Each stuffed acorn squash is perfect as a side dish or serving two halves as a main course.  For a hardier dish, stir in a half-pound of fresh ground sausage meat, cooking it along with the vegetables before filling the squash halves.  


Roasted Acorn Squash with Caramelized Vegetables & Rice
2 cups brown rice, uncooked
3 small acorn squash or 2 large
3 tablespoons oil, divided
1 ½ teaspoon kosher salt, divided
1 medium onion, diced to equal 1 cup
baby bella brown or white button mushrooms, sliced to equal 1 cup
Brussel sprouts, sliced to equal 1 cup
1 large clove garlic, minced   
1/2 cup dried cranberries
3 tablespoons vegetable stock
1/2 cup grated white cheddar cheese
black pepper to taste

chopped fresh parsley for garnish

Cook the brown rice according to package directions.  Set aside to cool.

Preheat the oven to 375 degrees.  Line a sheet pan with foil.  Cut each squash in half horizontally.  Using a large spoon, scoop out and discard the seeds.  Using 1 tablespoon of oil, evenly rub over the cavity and outside of each half squash.  Sprinkle the cavities using ½ teaspoon of salt.  Place cut-side down onto the prepared baking sheet.  Roast in the preheated oven for 25 minutes.  Remove the sheet pan from the oven, flip each squash over with cut-side up.  Continue roasting for about 5-10 additional minutes.  The squash should be fork tender but still holding their shape.  Remove from the oven and set aside. 

Working with a large skillet over medium-high heat, add in the remaining 2 tablespoons of oil.  Add in the chopped onion and sliced mushrooms, along with ½ teaspoon of salt.  Stir, cooking until the vegetables begin to soften.  Add in the sliced Brussel sprouts and the garlic, continue cooking and stirring until the vegetables are soft and begin to brown.  

Measure out 3 cups of cooked rice.  Add to the skillet with the vegetables along with the remaining ½ teaspoon of salt.  Stir and cook together for 1 minute.  Add in the dried cranberries and vegetable stock stirring to combine.  Remove from the heat.  Stir in the cheddar cheese and black pepper.  

Divide the rice mixture evenly among the squash halves.  Return the sheet tray to the oven, heating for about 10-12 minutes until warmed through and lightly browned.  Transfer to a serving plate, garnish with chopped fresh parsley. 


Sunday, October 23, 2022

ChezCindy: Delicata Squash Rings with Parmesan Cheese


Each fall season I gather up the different squash available at the market, always on the look-out for delicata squash among the more standard acorn and butternut.  Delicata squash is a winter squash meaning that it has a hard interior flesh.  But it crosses over to summer squash like zucchini in that the thin skin can be eaten.  A real bonus when it comes to winter squash as most have inedible skin and it can be difficult to peel away the skin.  


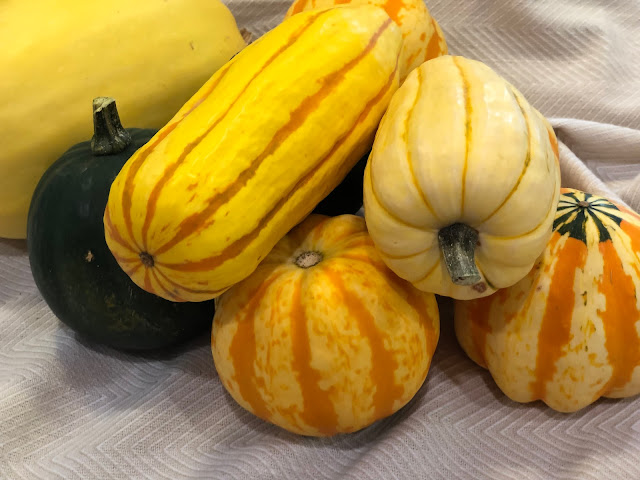
The delicata squash are the two sitting on top of the pile with a long shape and stripes.  The other squash are spaghetti, acorn and kaleidoscope which is similar to acorn.


The delicata squash rings were put together on a whim one morning.  The thought came to me that Parmesan cheese might pair really well with the squash.  I've made them numerous times now for breakfast as the flavor and texture remind me of potatoes, so think hashbrowns.  The squash rings would make a nice appetizer with a glass of crisp white Italian wine, or as a side dish to Chicken Parmesan. 


Delicata Squash Rings with Parmesan Cheese
1 medium or 2 small delicata squash
1 tablespoon oil
1/4 teaspoon kosher salt
2 teaspoons butter
2 tablespoons fresh grated Parmesan cheese

Making the rings is more of a process than a recipe.  Simply slice across the squash cutting the squash into 1/4-inch rounds.  Lay each round piece on the flat side, using a spoon scrape out the seeds. 

 Working with a large non-stick pan over medium-high heat, drizzle in a tablespoon of oil placing the squash rings in a single layer in the pan, sprinkle the salt over the rings.  Allow the rings to cook without moving them for 1-2 minutes, then add in the butter in small pieces to evenly distribute among the squash rings.  The butter will sizzle and bubble.  Keep the squash rings on side one for several minutes until this first side is golden brown.  The butter will help the squash to brown and add great flavor.  Once side one is brown and the squash is now mostly cooked through, flip over each ring to cook on side two for just a brief minute.  Sprinkle on the Parmesan cheese, then immediately turn off the heat.  Transfer the squash rings and Parmesan to a plate.  


Saturday, October 15, 2022

ChezCindy: Apple Cheddar Drop Biscuits


Fall is the perfect time of year to make these Apple Cheddar Drop Biscuits.  A visit to the apple orchard or just a variety of crisp apples from the market are great to have on hand for so many wonderful recipes, or just to eat out of hand.  Here are just few recipes from my blog site such as Apple Pumpkin Muffins combining the best of both fall ingredients.  And this surprisingly refreshing Apple Cucumber Salad.  When you are looking to impress make this French Apple Tart.

This biscuit recipe is an easy one to begin with if making biscuits is new to you.  It is a drop biscuit, so there is no rolling out the dough, no cutting and shaping the biscuits.  Just scoop it out and drop the biscuit dough onto the baking sheet.  Serve warm from the oven with some soft salted butter.  

The key to successful biscuit making is to have all of your ingredients ready before you start mixing by hand.  Once you start mixing, your fingers are covered in biscuit dough.  Stopping to measure out the cream or to line the pan with parchment paper is a bit of a problem with doughy fingers.  Read the recipe, have the ingredients measured, the baking tray in place, and the oven pre-heated.  Relax and enjoy the process.... and the biscuits! 


Apple Cheddar Drop Biscuits
1 1/2 cups all-purpose flour
1/4 cup granulated sugar
4 teaspoons baking powder
1/4 teaspoon kosher salt
6 tablespoons cold unsalted butter
4 tablespoons finely diced apples
4 tablespoons grated white cheddar cheese
5 tablespoons heavy cream
1/4 cup cold water

extra cream for brushing on the biscuits
turbinado sugar to top the sweet biscuits

Makes 6 large biscuits

Preheat the oven to 425 degrees.  Line a sheet pan with parchment paper.  

Key to successful biscuit making is to have all of your ingredients ready before you start mixing.  Because once you start, your fingers are covered in biscuit dough.  Read the recipe, have the ingredients measured, the baking tray in place, and the oven pre-heated.  

Cut the cold butter into small pieces.  I like to start with a stick of butter, cutting out 6 tablespoons, (setting the remaining 2 tablespoons aside for serving).  Then cut each of the 6 tablespoons into 9 tiny pieces. 

Cut the apple into small pieces, roughly 1/4-inch dice, set aside.  Grate the cheddar cheese, set aside.  

Measure out the cream, and the cold water.
  
Working with a large mixing bowl, add in the flour, sugar and baking powder.  Using your fingers, mix the ingredients to combine.  Add in the tiny cut pieces of butter, tossing them to coat with the flour mixture.  Begin working in the butter by using your fingertips to "snap" or rub the butter to combine it with the flour.  This will take 5-8 minutes.  The butter will no longer look like tiny cubes of butter but will be mostly combined with the flour.  It should look somewhat crumbly.  Add in the diced berries, tossing them gently to coat with the flour/butter mixture.  

Make a well in the center of the mixture.  Pour in 4 tablespoons of the cream, reserving 1 for additional use if needed.  This is where it gets really messy.  With your fingers, mix the flour with the cream to create a shaggy dough.  Add in the 1/4 cup of cold water, mixing to gently combine.  The dough should be wet but not gloppy.  Add in the additional tablespoon of cream if the dough is still a bit dry.  This is the judgement part of making biscuits.  The dough should be held together with no dryness of the flour bits.  Stop mixing.  

Using a 1/3 cup measure, spray the cup with oil.  This will help the biscuit dough to slip out of the measuring cup.  Scoop the dough into the measuring cup, drop the biscuit onto the lined sheet pan.  Repeat with the remaining dough to form 6 large biscuits.  Using a pastry brush, gently brush the tops with additional cream.  Sprinkle a bit of sugar (turbinado raw sugar if you have it) onto the tops of each biscuit.  

Bake in the preheated oven for 15-16 minutes until deep golden brown.  Remove from the oven, cool on the sheet tray for about 5 minutes so the biscuits are fully set.  Serve warm with butter and honey if desired. 


Friday, September 23, 2022

ChezCindy: Pasta Risotto with Chicken and Mushrooms


Making pasta in the style of risotto is not a new thing.  I simply had not tried this process before now.  It is good!  The pasta takes in flavor, absorbing the stock, garlic and vegetables as it hydrates and cooks.  It becomes full of flavor with great texture.  The tradeoff is the amount of time and attention it takes to make the pasta risotto.  You will need to tend to the pasta adding stock stirring for roughly 20 minutes.  I found it be a relaxing transition from a full day while I enjoyed a glass of wine.  


Pasta Risotto with Chicken and Mushrooms
3 tablespoons olive oil
1 small onion, finely diced
1 tablespoon minced garlic
2 cups brown or white button mushrooms, sliced
1 tablespoon tomato paste
2 cups dry gemelli or penne pasta
1/2 cup dry white wine
3-4 cups chicken stock
3 boneless skinless chicken thighs, cut into 2-inch pieces
2 teaspoons kosher salt, divided
black pepper
fresh parsley, chopped
fresh grated Parmesan cheese

Working with a large Dutch oven pan over medium-high heat, add in the olive oil.  When the oil is hot, add in the onion, garlic and mushrooms, stirring to coat in oil.  Cook while stirring occasionally for 6-7 minutes, then add in 1 teaspoon of kosher salt and a few grinds of black pepper.  Add in the tomato paste, stirring to incorporate with the mushrooms.  Add the dry pasta to the pan with the mushrooms, stirring together, then add in the wine, stirring for 2-3 minutes.  The wine will bubble and absorb into the mix.  Lower the heat to medium.  

Meanwhile, have the stock on the stove in a pan over a low temperature to stay warm.  Once the wine has absorbed into the mix, begin ladling 1/2 cup of stock into the pasta mix, stirring to combine.  After the ladle of stock has absorbed into the pasta, continue adding 1/2 cup at a time until you have added 2 cups.  At this point taste a piece of pasta to determine the tenderness.  It will mostly likely be too firm.  

Add in the chicken thighs and 1/2 teaspoon of kosher salt, stirring with the pasta.  Cook the chicken while continuing to add more stock and stirring.  Check the chicken for doneness of internal temperature of 165 degrees.  When the chicken has reached correct temperature, taste the pasta for texture.  You will want a tender pasta but not soft.  You may not use all of the stock.  

Remove from the heat, adjust for seasoning, garnishing with fresh parsley and grated Parmesan cheese.  


Friday, September 9, 2022

ChezCindy: Cauliflower Goat Cheese Gratin


When has cauliflower looked better?  This recipe is a simple 5-ingredent, minimal time and cleanup dream.  A dream only if you like cauliflower.  In my house, that is just me and the dogs!

My recipe is adapted from Bobby Flay, downloaded from the Food Network years ago.  It is super healthy by way of the cauliflower but watch out for the calories coming from heavy cream and three types of cheese.  Serve it with a green salad or a simple piece of grilled fish or chicken.  


Cauliflower Goat Cheese Gratin
1 medium head of cauliflower, cut into florets
1 cup heavy cream
6-ounces goat cheese
2 ounces grated fontina cheese
2 ounces grated Parmesan cheese
1/2 teaspoon kosher salt

Preheat the oven to 400 degrees.

Place the cauliflower florets into a medium size casserole dish, spreading out into an even layer.  Pour in the cream.  Crumble and scatter the goat cheese over the florets, along with the fontina and Parmesan cheese.  Sprinkle on the kosher salt.   

Place the casserole dish into the hot oven, roasting for 30 minutes until the cauliflower is tender and the sauce has slightly thickened.  Remove from the oven, resting for 10 minutes before serving.


Note:  Other cheeses can be substituted such as gruyere and Pecorino, and herbed goat cheese work well together.  


Thursday, September 1, 2022

ChezCindy: Summer Corn Cauliflower & Chickpea Salad


Inspiration for this salad came from thoughts of Mexican Street Corn.  Which would have been fabulous as a salad, but I took this salad in a different direction to the Mediterranean.  I used Greek yogurt in the salad dressing, chickpeas, feta cheese with fresh mint and parsley, which all compliment the sweet summer corn and cauliflower.   

The salad is wonderful for sharing and can be made ahead of time as it holds up well fully tossed with the salad dressing.  It may even get better after sitting for 20-30 minutes as the ingredients marinate in the dressing bringing out the best of each. 


Summer Corn Cauliflower Salad with Fresh Herbs
1/2 of a large cauliflower head
1 15-ounce can chickpeas, drained
3 large ears corn, cut from the cobs
1/2 red bell pepper, cut into 1/4-inch pieces
3 tablespoons chopped fresh parsley
3 tablespoons chopped fresh mint
1 teaspoon kosher salt
1/4 teaspoon black pepper
3 tablespoons crumbled feta cheese
1 head bibb lettuce

Creamy Yogurt Salad Dressing (recipe follows)

Cut the cauliflower into large pieces, placing each into the bowl of a food processor fitted with the steel blade.  Pulse until chopped into small bits.  You should have about 4 cups for the recipe.  Transfer the chopped cauliflower into a large bowl.

Add the drained chickpeas to the bowl with the cauliflower.  Add in the fresh cut corn as cut from the cobs, chopped red bell pepper, chopped parsley and mint.  Sprinkle on the salt and pepper.  Using a large spoon, gently stir to combine.  

Pour 6-8 tablespoons of the Creamy Yogurt Dressing over the salad, tossing to combine.  To serve, place individual leaves of the bibb lettuce onto a platter, spooning the dressed salad into each lettuce leaf, piling the remaining salad into the center.  Crumble the feta cheese over the salad.  Garnish with additional herbs, and a drizzle of additional salad dressing.  


Creamy Yogurt Dressing
1 tablespoon Dijon mustard
1 tablespoon honey
1 teaspoon kosher salt
pinch of fresh ground pepper
2 tablespoons apple cider vinegar
6 tablespoons olive oil
2 tablespoons plain full fat Greek yogurt

In a small bowl, add the Dijon mustard, honey, salt and pepper; whisk to combine.  Add the vinegar; whisk to combine.  Slowly drizzle in the oil, whisking vigorously while doing so.  Whisk in the yogurt.  


Saturday, August 20, 2022

ChezCindy: Classic Iceberg Wedge Salad


Iceberg lettuce may have fallen out of favor with so many lettuces taking top marketing for nutritional value and taste.  But none of the kale, spinach or arugula mixes can stand in for the classic wedge salad.  Only iceberg can take center stage for this steakhouse favorite.  

This salad is simple and quick to put together, great to serve on a hot summer day.  The lettuce is crisp, juicy and deliciously chilled, served with just a few ingredients.  Key to success is a creamy dressing drizzled in abundance.  Optional additions are cherry tomatoes, bacon, and chopped fresh herbs.  Most are served with blue cheese, but feta could stand in as a substitute if blue cheese is not preferred or skip the cheese altogether.  

As far as nutrition goes, iceberg lettuce can hang in with the other lettuces.  It is loaded with vitamins K and A and has high water content to keep us hydrated on these hot summer days.  Dig in and enjoy!


Classic Iceberg Wedge Salad
1 head of iceberg lettuce
1 cup cherry tomatoes, each sliced in half
2 tablespoons chopped fresh chives
4 tablespoons crumbled blue cheese
flakey sea salt for serving

Creamy Salad Dressing 
1 tablespoon Dijon mustard
1 tablespoon honey
1 teaspoon kosher salt
pinch of fresh ground pepper
2 tablespoons apple cider vinegar
6 tablespoons olive oil
2 tablespoons mayonnaise
2 tablespoons plain full fat yogurt

In a small bowl, add the Dijon mustard, honey, salt and pepper; whisk to combine.  Add the vinegar; whisk to combine.  Slowly drizzle in the oil, whisking vigorously while doing so.  Whisk in the mayonnaise and yogurt. 


Putting it all together:  Make the dressing, then keep chilled until ready to serve the salad.  

Using a large knife, cut the head of iceberg lettuce into 4 equal wedges, cutting through the core.  Place each wedge onto a large dinner plate.  Drizzle 2-3 tablespoons of dressing over each wedge.  Scatter a generous portion of halved cherry tomatoes, a sprinkling of chopped chives, 1 tablespoon of blue cheese, and a shower of flaked sea salt over each wedge.  Serve chilled within 30 minutes of dressing the salad.  


Friday, August 12, 2022

ChezCindy: OMG Giant Peach Muffins


These giant peach muffins were inspired by the abundance of peaches I had from my annual peach picking with my BFFEach year we head out for our adventure to pick peaches.  The peaches are always gorgeous, and I come home with a full peck, which is a lot of peaches.  Peaches don't hold for a long time like apples.  They ripen quickly and need to be eaten, used for baking and cooking, or frozen within a short time period.  I've been baking, and sharing, many of my favorite recipes, like peach bars and this new recipe for peach muffins.

This recipe for Giant Peach Muffins was inspired by a new cookbook by Jessie Sheehan, Snackable Bakes.  Ms. Sheehan's book is full of fabulous recipes that come together quickly with limited equipment, usually just a large bowl, whisk and rubber spatula, and go from idea to eating in short time.  I like that!  Not always do I want a baking project that takes a full day or multiple days.  Simple.  

The original recipe called for cherries, another favorite fruit, but I really needed to use the peaches.  The recipes in this book offer suggestions for swap-out variations.  It seemed logical if I could swap out cherries for raspberries or strawberries, I could do the same with peaches.  Lucky for me, it worked beautifully.  

A few notes about the recipe.  By itself without fruit the recipe is delicious.  Full of vanilla, deeply golden brown and a great texture.  If you choose to use fruit, use a soft fruit like peaches, raspberries, or cherries, measuring to 2 cups of chopped fruit.  A firm fruit such as apples might not cook fully.  The recipe calls for 2 tablespoons of vanilla extract.  That is not an error as you might think teaspoons is meant.  The vanilla is delicious in the muffins and your house will smell wonderful as the muffins are baking.  If you don't have turbinado sugar in your pantry, it is a good addition to have on hand.  You will use it often to add a sprinkle of shine and crispy tops to many pies, cookies and muffins.  I highly recommend it.  The recipe calls for starting the bake at a high temperature, 400 degrees.  This will yield a high puff and a quick brown of the muffin.  The temperature is reduced 15 minutes into the baking time to 350 degrees.  Make note of this reduction otherwise the muffins will be over baked.  Below is my adaptation of Ms. Sheehan's muffin recipe.  


Giant Peach Muffins
1/3 cup vegetable oil
1 1/4 cups granulated sugar
2 tablespoons vanilla extract
2 large eggs
2/3 cups full-fat yogurt or sour cream
1 1/2 teaspoons baking powder
1/4 teaspoon baking soda
1 teaspoon kosher salt
2 cups all-purpose flour
2 cups chopped peaches, raspberries or cherries

Turbinado sugar for sprinkling 

Preheat the oven to 400 degrees.  Grease the wells of a large 6-well muffin tin (not standard size) with cooking spray oil to coat thoroughly.  Set aside.

Working with a large mixing bowl, add in the oil, sugar and vanilla whisking to combine for 30 seconds.  Whisk in the eggs, one at a time, then add in the yogurt whisking to combine.  One at a time, whisk in the baking powder, baking soda, and kosher salt whisking well after each addition.

Fold in the flour and the peaches, (or other fruit if using) using a rubber spatula just until combined, not over mixing.  Divide the batter among the prepared muffin wells.  The 6 wells will be very full.  You may have batter leftover.  Sprinkle 1 teaspoon of turbinado sugar over the top of each muffin.

Place the muffin tin into the preheated oven at 400 degrees, baking at this temperature for 15 minutes.  Reduce the oven temperature to 350 degrees, baking for an additional 20-25 minutes until deeply brown and a toothpick inserted into the center of the muffin comes out clean with just a few crumbs. A total of 35-40 minutes baking time.  

Remove from the oven, allowing the muffins to cool in the pan for about 10 minutes.  Using a butter knife gently loosen the muffins from the tin, transferring to a wire rack to cool.  Keep the muffins on the counter until they are gone, up to 2 days.  


Sunday, July 24, 2022

ChezCindy: Grilled Steak with Farm Tomatoes & Feta


This simple dish of grilled steak and tomatoes has been in my cooking rotation for many years.  Sometimes I forget to make our favorites as it had been years since I made this for dinner.  Last night was perfect timing as I had lots of gorgeous tomatoes from the farmer's market.  

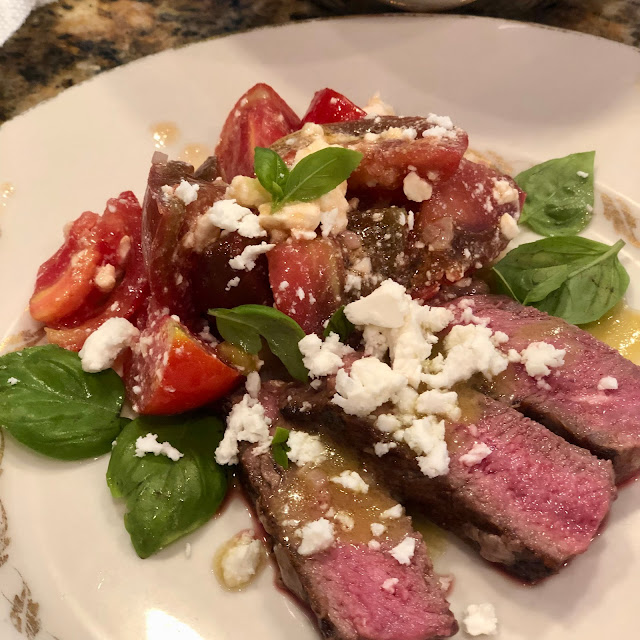
The recipe is simple.  Basically, grill a strip steak as you prefer, medium rare for us.  The key to success is to have really good tomatoes from a farm stand, perfectly ripe and ready for use.  Make a vinaigrette and you are done.  I like to serve a few center-cut slices of the steak, pile on a good amount of tomatoes, drizzle all with vinaigrette and a sprinkle of crumbled feta.  A fabulous summer meal.  


Grilled Steak with Farm Tomatoes and Feta
2 strip steaks, 10-12 ounces for each steak
4-5 large heirloom tomatoes, any variety and color
Shallot vinaigrette
Feta cheese
Fresh basil for garnish

Serves 4

Light a grill or prepare an indoor grill pan as preferred.  Season the steaks with salt and pepper.  Grill to your preference in temperature.  Remove from the grill transferring to a plate to rest for 5 minutes.  

While the steaks are grilling, make the shallot vinaigrette and prepare the tomatoes.  

1 tablespoon finely chopped shallots
1 tablespoon Dijon mustard
1 tablespoon honey
1/2 teaspoon kosher salt
1/8 teaspoon cracked black pepper
2 tablespoons red wine vinegar
6 tablespoons olive oil

To make the vinaigrette:  Place the chopped shallots, Dijon mustard, honey, salt & pepper in a small bowl.  Whisk to combine.  Add the vinegar; whisk to combine.  Allow this mixture to marinate for 5 minutes.  This will mellow the flavor of the shallots.  Slowly drizzle in the oil, whisking vigorously while doing so.

Cut the tomatoes into 1-inch pieces.  Place the tomatoes into a separate medium size bowl.  Add 3-4 tablespoons of vinaigrette to the tomatoes, tossing gently to combine.  

Putting it all together:  After the steak has rested, cutting crosswise, cut each steak into 1/2-inch slices.  Place 3-4 slices in the center of each plate.  Place a heaping mound of the dressed tomatoes above the sliced steak.  Drizzle a tablespoon of dressing over the steak slices, crumble the feta over the steak and tomatoes. Garnish with fresh basil leaves.  


Sunday, July 17, 2022

ChezCindy: Blondies - An American Cookie


Blondies are a bar cookie quite often compared to brownies but without chocolate.  I had never baked or even considered baking a blondie until recent years.  I was fortunate enough to be in vicinity of being able to purchase cookie boxes from Joy Cho Pastries.  Joy presented a sampling of various cookies in her boxes, all with her unique application of ingredients to traditional cookies.  Occasionally the boxes included blondies.  The blondies became my coveted favorite that I would declare as mine, not sharing with anyone else.  Sounds kind of harsh, but my husband prefers chocolate cookies, so it worked out well.  Joy is back in NYC doing fabulous baking and I am left on my own to bake blondies.  

First, I had to do some research to find a base recipe.  It turns out blondie recipes can be somewhat controversial among bakers.  I have learned that the first blondie recipe came into publication in the1890's using molasses as the sweetener, lending a dark color to the cookie bar.  Blondies were quickly upstaged by Brownies using a similar recipe with the addition of chocolate and using white sugar in place of molasses.  Blondies fell out of favor until the late 1980s when New York City bakeries and delis started selling the homemade cookie bars as packaged sweet treats.  Recipe development took off from there, with a more modern spin on the traditional recipe by adding leavening (baking powder and baking soda), increasing the amount of butter used, switching from molasses to brown sugar, and adding decadent ingredients like chocolate chips, white chocolate chips, toasted nuts and more.  

The first recipe I tried was from one of my mother's old cookbooks.  It was truly awful, very bland and flat.  I am using them as dog treats.  Much research later, I have found my base recipe for Blondies.  This recipe is a blend of modern and traditional, with the use of leavening, and the only add-in is toasted walnuts.  My vision is to use this base recipe with various changes such as adding spices like cinnamon or cardamom.  I most certainly will add chocolate chips at some point, and maybe adding dried cherries or cranberries.  


Chewy Blondies with Toasted Walnuts
2 cups all-purpose flour
3/4 teaspoons baking powder
1/2 teaspoon baking soda
1/2 teaspoon kosher salt
2 sticks (8-ounces) unsalted butter, room temperature
1 1/2 cups light brown sugar, packed
1/2 cup sugar
2 large eggs, room temperature
2 teaspoons vanilla extract
2 cups toasted walnuts, chopped

Preheat the oven to 325 degrees with the rack placed in the center of the oven.  Butter and lightly flour a 9"x13" baking pan.  Set aside.

In a medium size bowl, add in the flour, baking powder, baking soda and salt, stirring to combine.  Set aside.

Working with a stand mixer fitted with the paddle attachment, add the butter to the bowl, mixing for 3-4 minutes until creamy.  Add in both sugars, creaming together for 2-3 minutes.  Add in the eggs, one at a time, mixing for 1 minute before adding the second egg and the vanilla, mixing again for 1 minute.  Turn off the mixer to add in the dry ingredients, with the mixer set to low speed, mix until just combined.  Add in the toasted walnuts, using a rubber spatula to be sure they are evenly distributed within the batter. 

Transfer the batter to the prepared baking pan.  The batter is somewhat thick and will take some effort to distribute evenly.  Bake in the preheated oven for 35-38 minutes.  The blondies will slightly pull away from the sides of the pan and the top will be lightly browned.  Cool the blondies in the pan for 10 minutes.  Place a cooling rack on top of the pan to flip out the blondies from the pan.  Place a large cutting board on top of the blondies to flip over again so that the blondies are now right side up.  

The blondies can be cut while still slightly warm or can be cut when they are cooled to room temperature.  Store the cut blondies in an air-tight container or freeze for later use.  


Saturday, June 25, 2022

ChezCindy: Zucchini Banana Bread


This mash-up of zucchini and banana came by way of using what I had available.  I had one sad looking banana and 1 zucchini, each in the condition of use it or throw it out.  I decided to make zucchini banana bread.  Something I have never thought to do.  If I did an internet search, most likely I would find that such a recipe exists.  However, I simply decided to use my tried-and-true zucchini bread recipe I have used since I was very young.  I'm not sure when I hand-wrote out the recipe card, but it is still my go-to for zucchini bread.  


I had more zucchini than banana, so the bread is more of a standard zucchini bread, with just a bit of banana as a background flavor.  From the recipe card, you can see the original measure of zucchini is 2 cups.  I swapped out 1/2 cup for banana in this new recipe.  Both resulting breads are wonderful.  I was pleasantly surprised how much I enjoyed the addition of banana.  Use what you have to equal a 2-cup measure.   


Zucchini Banana Bread
3 large eggs
1 cup vegetable oil
2 cups sugar
1 1/2 cups grated zucchini
1/2 cup mashed banana 
1 teaspoon vanilla
3 cups all-purpose flour
1 teaspoon kosher salt
1 teaspoon baking soda
1 teaspoon baking powder
2 teaspoons cinnamon

Makes 2 loaves 

Preheat the oven to 350 degrees.  Prepare 2 loaf pans, 8"x4" in size, by lightly spraying each with baking oil spray.  Set aside.

To make this recipe, use an electric stand mixer or a hand mixer.  I used a fork and a spatula.   

Working with a large size mixing bowl, add the eggs and the oil to the bowl, mixing to combine thoroughly.  Add in the sugar, grated zucchini, mashed banana and vanilla, mixing to combine.  In a separate medium size bowl, add the flour, salt, baking soda, baking powder, and cinnamon, whisking to combine.  Transfer the dry ingredients to the wet ingredients.  Folding together until just combined.  

Transfer the batter to the prepared loaf pans.  Place the pans into the preheated oven, baking for 55-60 minutes until golden brown and a toothpick inserted into the center of the bread comes out clean.  Remove from the oven, cooling in the pans for 10 minutes.  Remove the bread from the pans to cool on a rack. 


Sunday, June 12, 2022

ChezCindy: Carrot-top Parsley Pesto with Parmesan


It was not new to my awareness that carrot-top leaves are edible.  I don't think I had even eaten them in a restaurant or certainly had not used the leaves in my own cooking.  Their gorgeous green color and feathery fern-like leaves are attractive to the eye but sadly discarded.  I was at the farmer's market and kept seeing carrots greens peeking out of the tops of other customer's market bags.  This brought inspiration that I should make something with carrot leaves.  Carrot-top pesto came to mind and what an awakening that was.   

Pesto most commonly is thought of as being made with basil leaves.  Actually, the word pesto means to pound as traditionally made with a mortar and pestle.  Of course, we now have the convenience of using a food processor.   Pesto can be made from many types of herbs and leaves such as kale and spinach pesto, garlic scape pesto, and even sundried tomato basil pesto.  

In this recipe I use carrot leaves and parsley leaves which pair together very well.  I encourage you to taste the carrot leaves on their own in comparison to the parsley leaves.  Both are bitter, with the parsley leaves having a stronger punch than the carrot leaves.  Using them together in a standard recipe in place of basil results in a delicious flavorful pesto.  Also not surprising is the nutritional value of carrot-top leaves.  They are off-the-chart in vitamin A just like the carrots themselves, and high in potassium. 

Other uses for carrot-top leaves are to sauté carrots slices in olive oil adding chopped carrot leaves at the end of the cooking time finishing with a sprinkling of kosher salt or adding chopped carrot leaves to homemade soup as you would parsley leaves.  


Carrot-top Parsley Pesto with Parmesan
1 cup carrot-top leaves from 1 bunch of carrots, well cleaned and dried
1/2 cup parsley leaves
1 garlic clove
1/4 cup roasted cashews, unsalted or lightly salted
1/2 cup olive oil
1/2 teaspoon kosher salt
1/4 cup fresh grated Parmesan cheese

Working with a food processor, add the carrot leaves and the parsley leaves, along with the clove of garlic to the processor bowl.  Pulse the contents until coarsely ground.  Add in the cashews, pulsing until mostly combined.  Add in half of the olive oil, pulsing to begin to make a sauce.  Add in the remaining oil and the salt, processing until blended.  Add in the Parmesan cheese, pulsing until just combined, not over-processing. 

Serve with pasta or drizzled over crostini toasts.  Also, delicious folded into scramble eggs or an omelet.  


Summer Vegetable Tart with Carrot-top Pesto  

Make this tart using the recipe link above, substituting the carrot-top parsley pesto for the basil pesto.  


Thursday, June 2, 2022

ChezCindy: French Potato Salad with Broccoli


French potato salads are made with a mustard vinaigrette and lots of fresh herbs to dress waxy new potatoes.  Most American potato salads are made with a mayonnaise base as the dressing.  Both are delicious.  The French potato salad is best served at room temperature, making it perfect for an outdoor picnic gathering with no worries of the mayonnaise getting too warm for safe serving temperature. 

 In this recipe, I have taken a twist on tradition by adding steamed broccoli.  If broccoli is not for you but like the idea of adding a vegetable, steamed green beans would be more traditional.  

For a quick and easy method to steam the added vegetables, click here to learn that process. 

I used my standard Chez Cindy vinaigrette recipe using white wine vinegar and olive oil, with Dijon mustard and honey.   


French Potato Salad with Broccoli
1 pound bite-size red-skin and new potatoes
3 cups broccoli florets, steamed
1 small shallot, minced
3 tablespoons fresh herbs (tarragon, parsley, chives)
1 1/2 teaspoon kosher salt
5 tablespoons Chez Cindy vinaigrette

Scrub the potatoes well, leaving the skins on.  Place the whole potatoes into a saucepan, filling the pan with cold water to cover the potatoes by 1/2-inch.  Bring the water to a boil, reduce the heat cooking the potatoes until they are just tender when pierced with the tip of a knife.  Drain and allow to cool.  

Steam the broccoli, cool to room temperature.  Tear the florets into small bite-size pieces.  Mince the shallot.  Tear or rough chop the fresh herbs.  Make the vinaigrette.  

Putting it all together:  Place the cooked potatoes and the broccoli into a medium size bowl.  Add in the minced shallot, fresh herbs, and salt, gently tossing all together.  Pour the vinaigrette over the mixture, tossing gently to coat the potatoes, broccoli and herbs.  The potato salad can be served immediately or kept at room temperature for use within 1-2 hours. 

Recipe can be doubled if desired.  


Sunday, May 22, 2022

ChezCindy: Double Nut Harvest Grains Granola


Each time I create a new granola recipe I end up saying this is my new favorite.  But I really do love this Double Nut Harvest Grains granola.  It has a good balance of sweet and savory with a hint of salt.  I used walnuts and pecans, and an extra dose of mixed grains with the whole oats.  The Harvest Grains is actually a product from King Arthur Baking Company, as shown in the photograph below.    


The Harvest Grains product is a large bag with a combination of four grains and four seeds.  I initially bought it to make yeasted whole grain bread.  I found that I was not baking enough whole grain bread to work through the bag quick enough.  To be sure I did not waste it, I decided to store the bag in my freezer and come up with other ways to use it.  I have added the grains to oatmeal cookies, muffins, and now this granola.  It is a good value, not expensive for the quality and the amount of product.  But even for as often as I bake it is lot of grains, still highly recommended for purchase.

My new favorite granola is a great mid-day snack with a cup of tea, or more traditional as breakfast with yogurt and fruit.  Below are links for other favorite granola recipes.  


Double Nut Harvest Grains Granola
2 cups rolled oats
1 cup raw walnuts pieces
1 cup raw pecan pieces
1/4 cup Harvest Grains 
2 tablespoons unsweetened coconut
2 tablespoons ground flax seed
1 teaspoon kosher salt
1/4 cup olive oil
1/2 cup maple syrup

Preheat the oven to 300 degrees.  Line 1 rimmed baking sheet with parchment paper.  Set aside.

In a large mixing bowl, combine the oats, walnuts, pecans, Harvest Grains, coconut, flax seed and salt.  Stir to combine.  In a separate small bowl or mixing cup, add in the olive oil and maple syrup, using a whisk, stir to combine.   Pour the combined olive oil and syrup over the oat mixture.  Using a wooden spoon or rubber spatula, stir to completely coat the oat mixture.  Transfer the raw granola to the prepared baking sheet, spreading into an even layer.  Bake in the oven for 40 minutes without stirring until the granola is golden brown and toasted.  Remove the tray from the oven and allow the granola to cool completely without stirring.  This is where the magic takes place resulting in a crisp, solid layer of granola.  Once cool, break into large pieces.  Store in glass containers.  The granola will keep at room temperature for up to a month. 

Note - If you would like to add dried fruit, add in after fully baking the granola.

ChezCindy: Pan-Roasted Sesame Salmon


I have many recipes for Asian Salmon using traditional ingredients for Asian cooking, such as hoisin, soy sauce, mirin, garlic, ginger, and more.  Somehow, no two recipes are alike, and all are wonderful yet different.  I found this recipe in Eating Well magazine in 2020, sadly no longer in paper publication, but available online.  This recipe demonstrates that sesame seeds are not simply a garnish but add great flavor and texture to the glaze for the salmon.  

I encourage you to build your pantry with common Asian ingredients, ready for use in so many recipes.  I have several recipes on this site for you to try.  From Asian Sloppy Joes to Asian Lettuce Wraps and Shrimp and Broccoli Stir-fry.  The ingredients add great flavor, lending towards quick-cooking recipes, and so very pleasing to the palette.  


Pan-Roasted Sesame Salmon
4 green onions, white and green sections separated
1 clove garlic, minced
1 tablespoon hoisin sauce
1 tablespoon soy sauce
1 tablespoon sesame oil
1 tablespoon sesame seeds
1 teaspoon honey
1 teaspoon mirin
4 6-ounce pieces of salmon. skinless
1/2 teaspoon kosher salt
1 tablespoon canola oil

Preheat the oven to 350 degrees.  

Cut the green onions into 2 sections separating the white from the green.  Thinly chop the white section, and thinly chop the green section, keeping each separate.  Place the white chopped onions into a small bowl.  Set aside the green chopped onions to use as a garnish for the finished salmon dish.  Add the minced garlic, hoisin, soy, sesame oil, sesame seeds, honey, mirin into the bowl with the chopped white onions, stir to combine. 

Pat the salmon pieces dry using a paper towel, sprinkle with the salt.  Heat a 12-inch oven proof non-stick skillet over medium-high heat with 1 tablespoon of canola oil.  Place the salmon pieces, skin-side up, (what would have been the skin-side if the skin has been removed) into the heated skillet.  Cook the salmon for 4-5 minutes.  Flip the salmon over skin-side down.  Spoon the sesame sauce mixture over the salmon pieces.  Transfer the skillet into the hot oven, roasting the salmon for 4-5 minutes.  Remove the skillet from the oven.  Remove the salmon pieces from the skillet, sprinkle the chopped green onions over the salmon as a garnish.  Serve with sautéed vegetables or rice, if desired.  


Sunday, May 15, 2022

ChezCindy: Red Pepper Egg Cups


Here is a clever way to add vegetables to your breakfast meal.  Not only are you using a cut bell pepper as the edible baking cup, but I also add tiny cherry tomatoes to the pepper cup.  Add in a fresh egg, topped with a bit of cheese for a delicious breakfast or dinner.  

The egg cups can be baked ahead of time, stored in the refrigerator, and reheated in the microwave for a later time.  If this is the plan, bake the eggs on the shorter time, knowing that reheating will bring the eggs to a firmer texture.    

For another egg cup recipe, see an earlier post on the process egg cup recipes.  


Red Pepper Egg Cups
2 medium red bell peppers
12 small cherry tomatoes, 8 if larger in size
1/2 teaspoon kosher salt, divided
4 large eggs
1/4 cup shredded cheddar cheese
1/4 teaspoon dried Italian herbs, or oregano

Preheat the oven to 400 degrees.  Coat a small baking sheet with cooking spray oil

Cut each pepper in half through the stem end.  Remove the ribs and seeds.  Place the peppers in the pan, cut side up.  Place 2-3 cherry tomatoes inside the well of each pepper.  Sprinkle with a pinch of salt.  Place the baking sheet and peppers in the preheated oven, roasting for 15 minutes.  Remove from the oven.

Crack one egg into each pepper cup, sprinkling a bit of salt over each egg.  Divide the cheese evenly topping each egg, about 1 tablespoon per egg cup.  Sprinkle with the dried Italian herbs.  Return the baking sheet to the oven, baking the eggs for 12-15 minutes, depending on desired "doneness" for the egg.  Serve immediately while hot.  


Saturday, April 23, 2022

ChezCindy: Balsamic Roasted Cherry Tomatoes with Chicken and Pasta


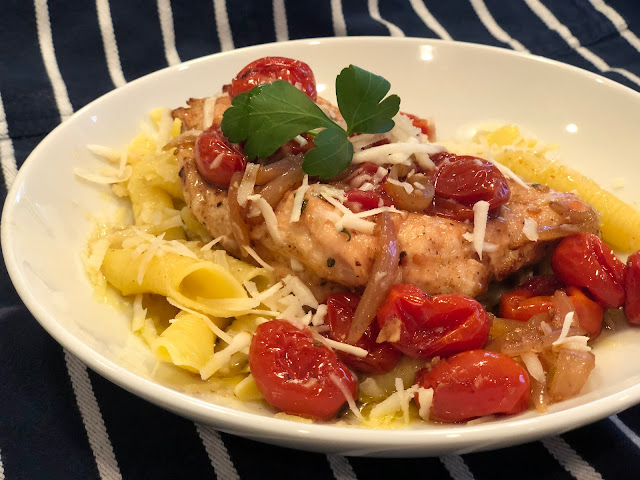
This lovely dinner of roasted cherry tomatoes and chicken was created with the intention to have a meal that could be eaten at time of making it or saved and reheated for another time.  Both have great success.  The chicken remains tender and moist due to the olive oil and balsamic vinegar.  If serving with the pasta, that too can be made ahead of time and stored separately in a zip-top bag, combining each after reheating.   I have also served this with quinoa or rice, but pasta is the favorite topped with grated Parmesan cheese.  


Balsamic Roasted Cherry Tomatoes and Chicken 
1 pint cherry tomatoes
3 cloves garlic, smashed
1/2 cup olive oil
2 tablespoons balsamic vinegar
2 teaspoons brown sugar
2 boneless, skinless chicken breasts, 8-ounces each
4 sprigs fresh thyme
1 small red onion, sliced vertically
1 teaspoon kosher salt
fresh ground black pepper

Preheat the oven to 325 degrees.  Working with a 10-inch square baking dish, or something similar, place the cherry tomatoes and the garlic into the dish.  Pour in the olive oil and balsamic vinegar, add in the brown sugar.  Stir a bit just to distribute the sugar.  Nestle in the chicken among the cherry tomatoes.  


Place the sprigs of fresh thyme on top of the chicken.  Scatter the sliced onions around and over the tomatoes and chicken.  Sprinkle on the salt and a bit of black pepper.  


Place the baking dish into the hot oven.  Roast for 35-40 minutes until the tomatoes have slumped and the chicken is tender with an internal temperature of 165 degrees.  Remove the thyme stems, with the fallen leaves remaining on the chicken.  Serve hot with pasta and grated Parmesan cheese as desired.